Kreative Gardens

Kreative Gardens LLC, License # 1137272

Proposal for

Jennifer & Steve Kosloske
Project:
Riverside Backyard Turf, DG & Corrective Grading
Prepared:
October 5, 2026

Quote Summary

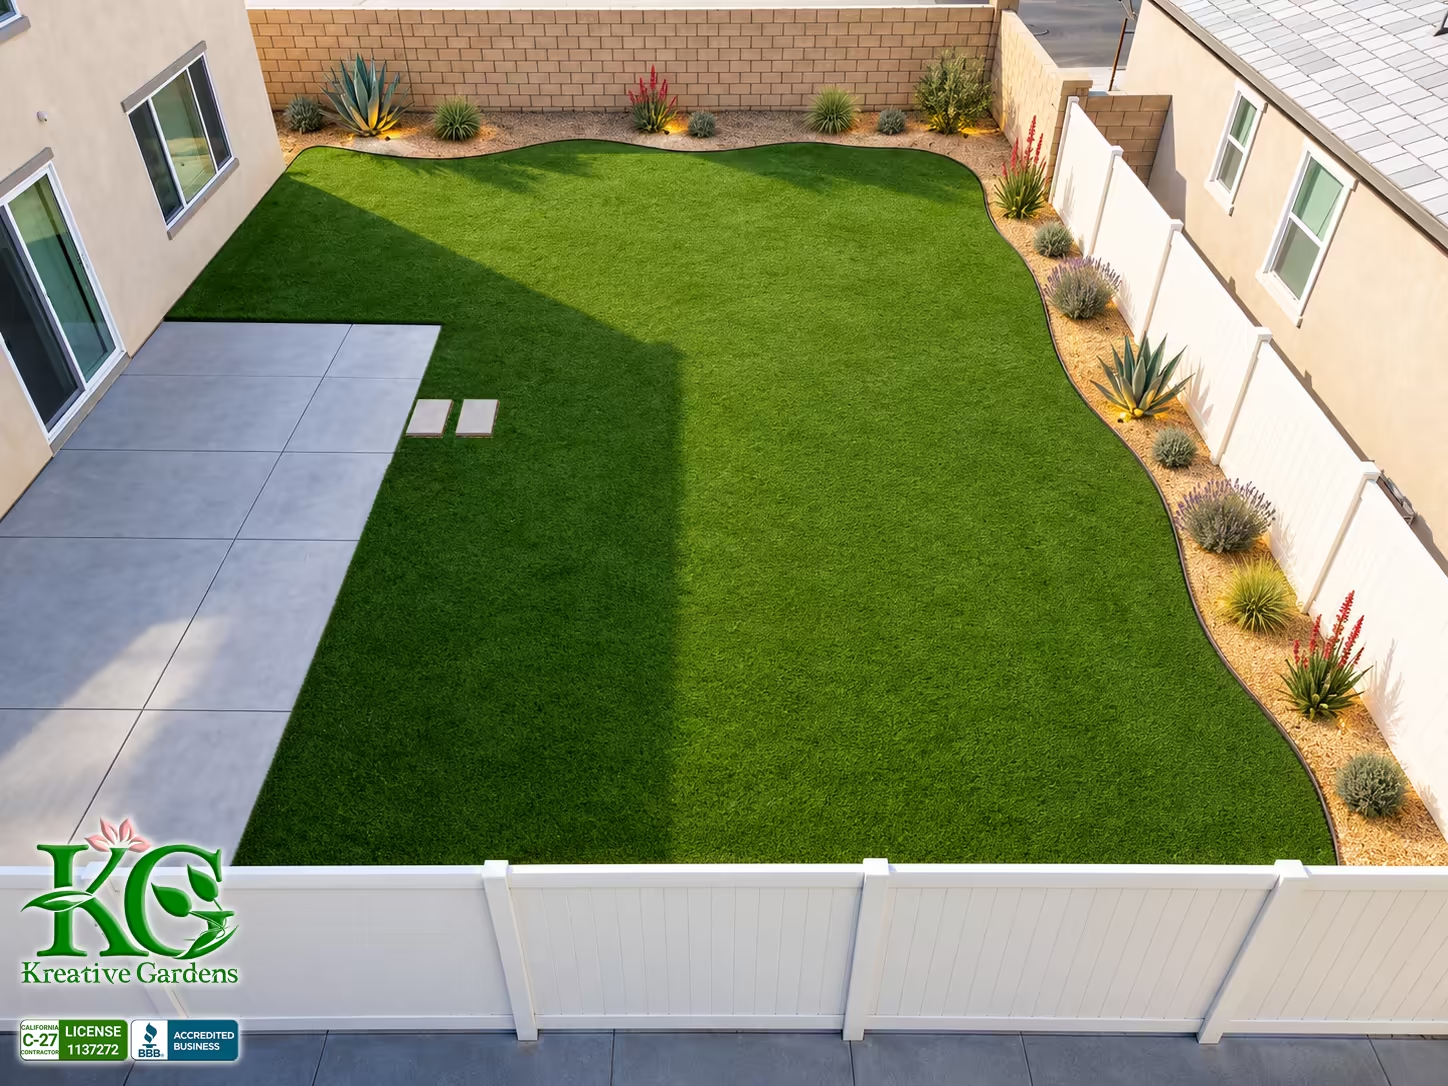
This proposal covers the complete backyard landscape installation for Jennifer & Steve Kosloske at 9715 Babaco Street, Riverside, CA 92508. The home was delivered without completed backyard landscaping, and Jennifer and Steve moved into the property in May 2026. The goal of this project is to create a finished, low-maintenance backyard now while intentionally preserving planting areas they can develop in the future.

The project is priced as one complete scope, while the work is shown as individual line items for clarity.

Existing Grade, Site History & Drainage

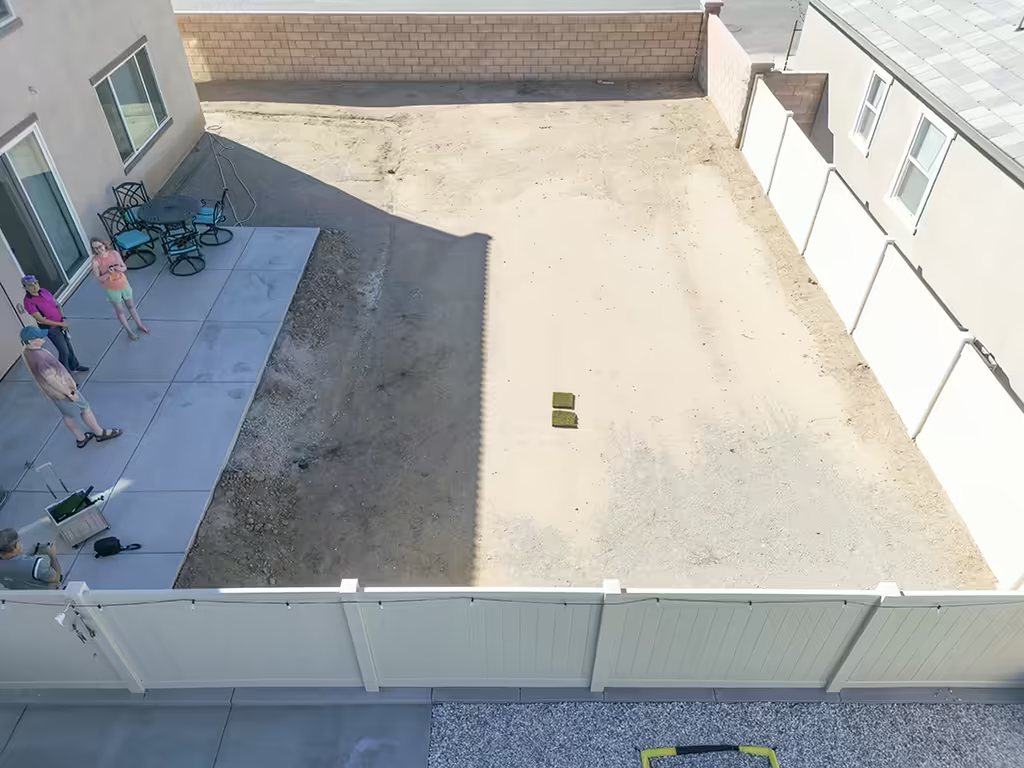
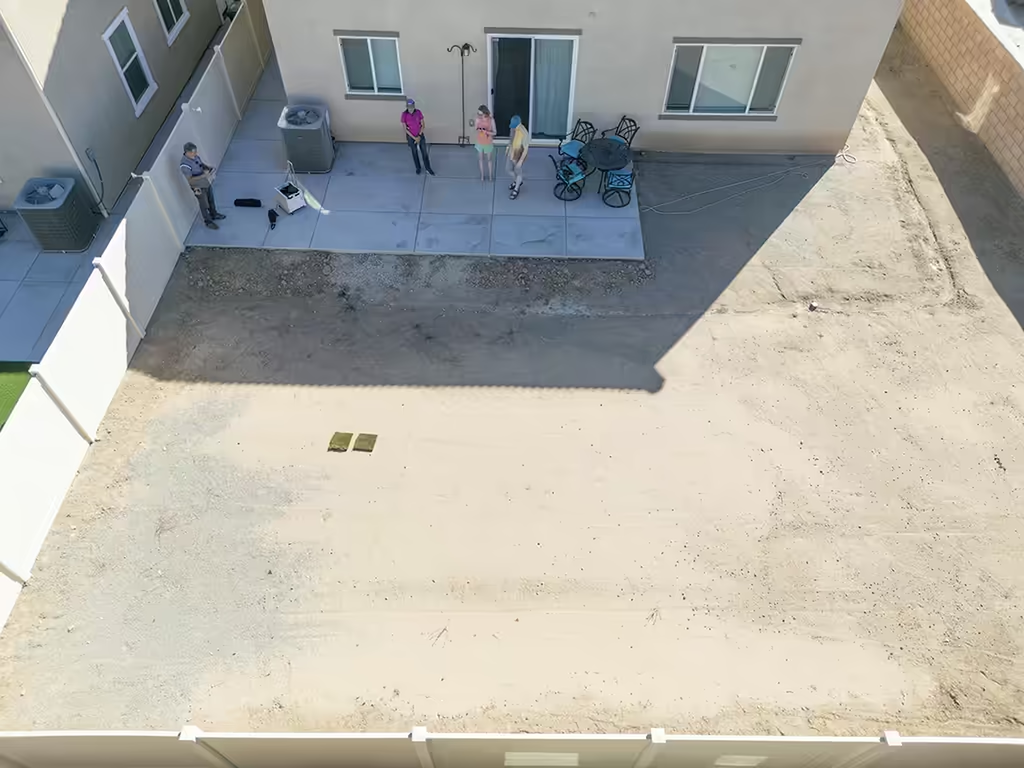
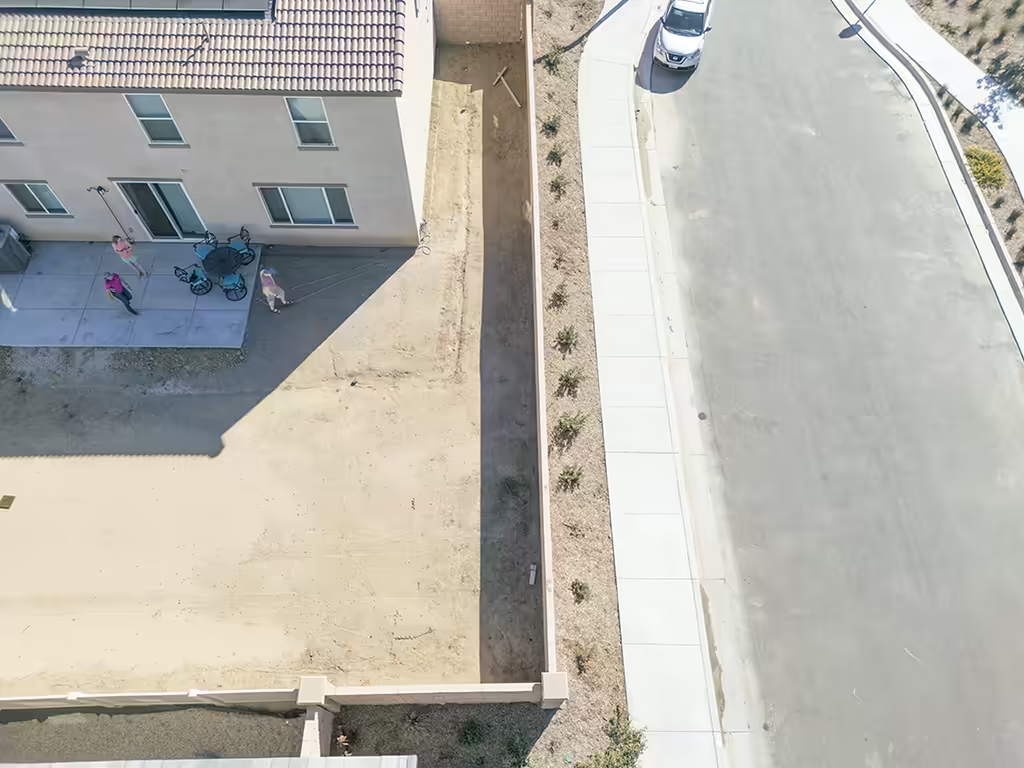
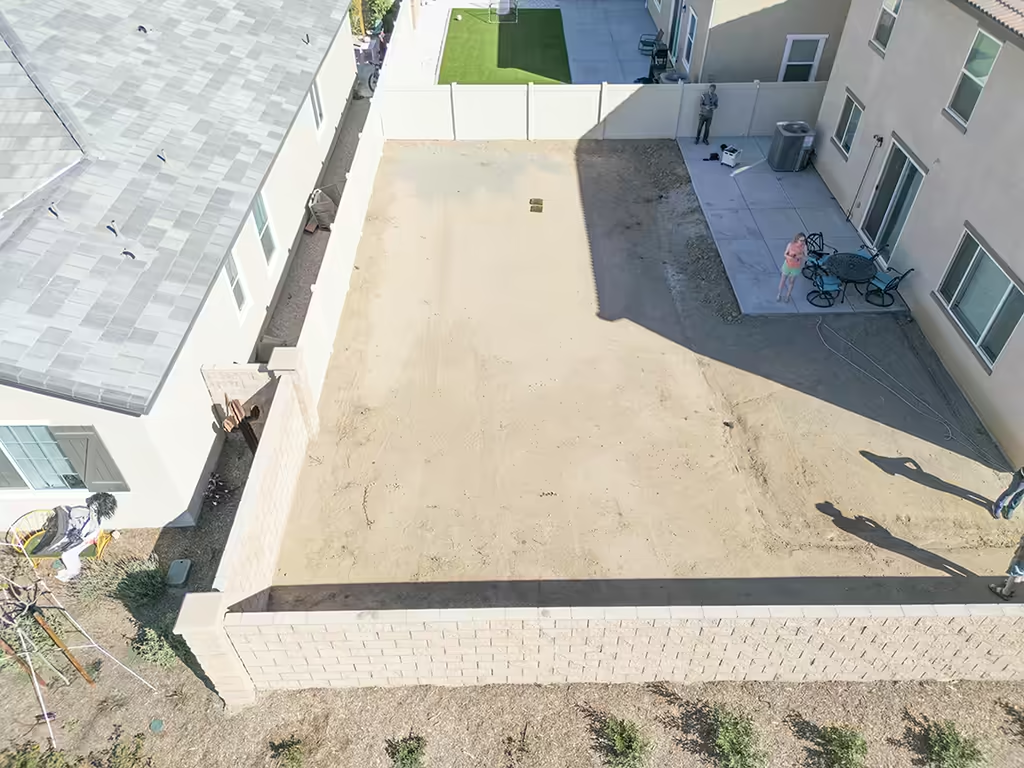
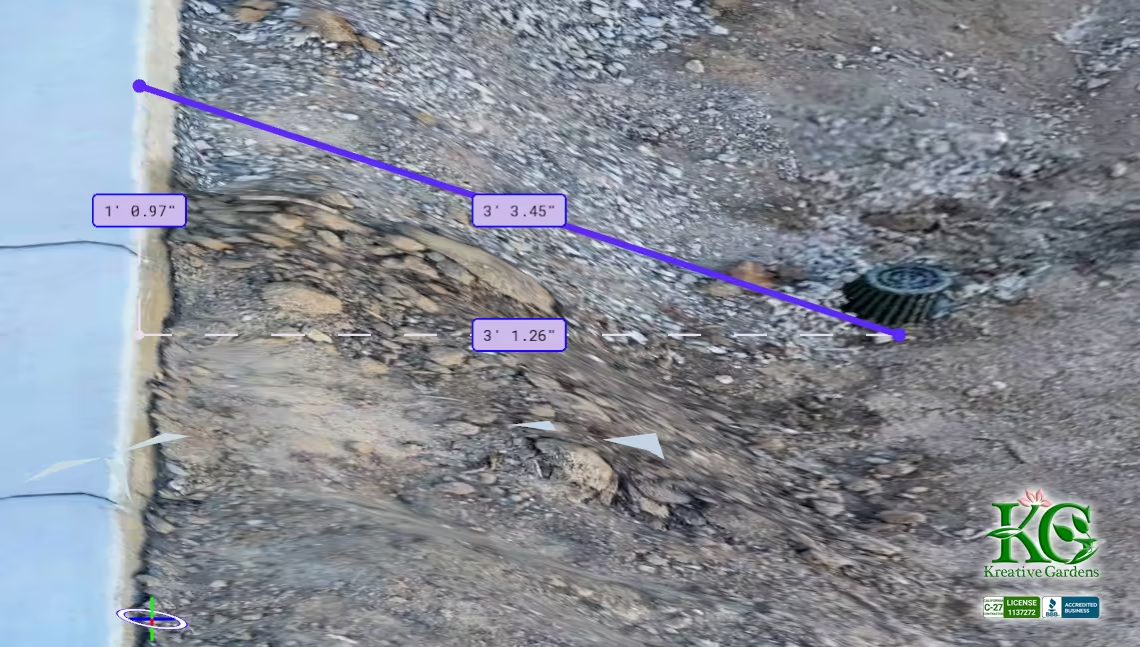
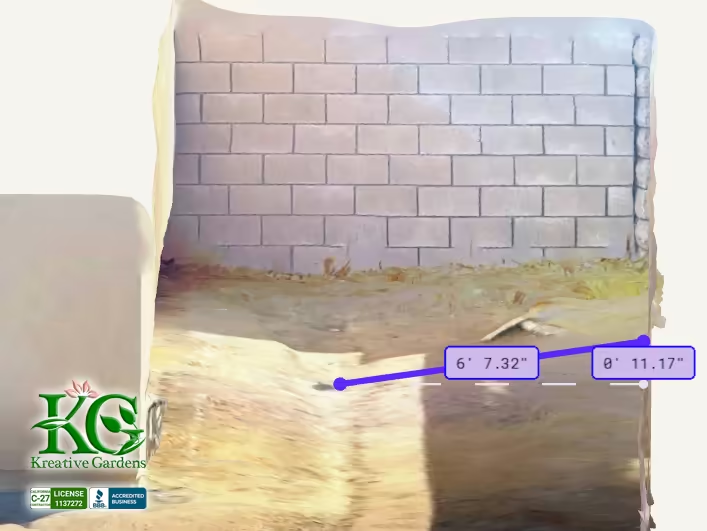
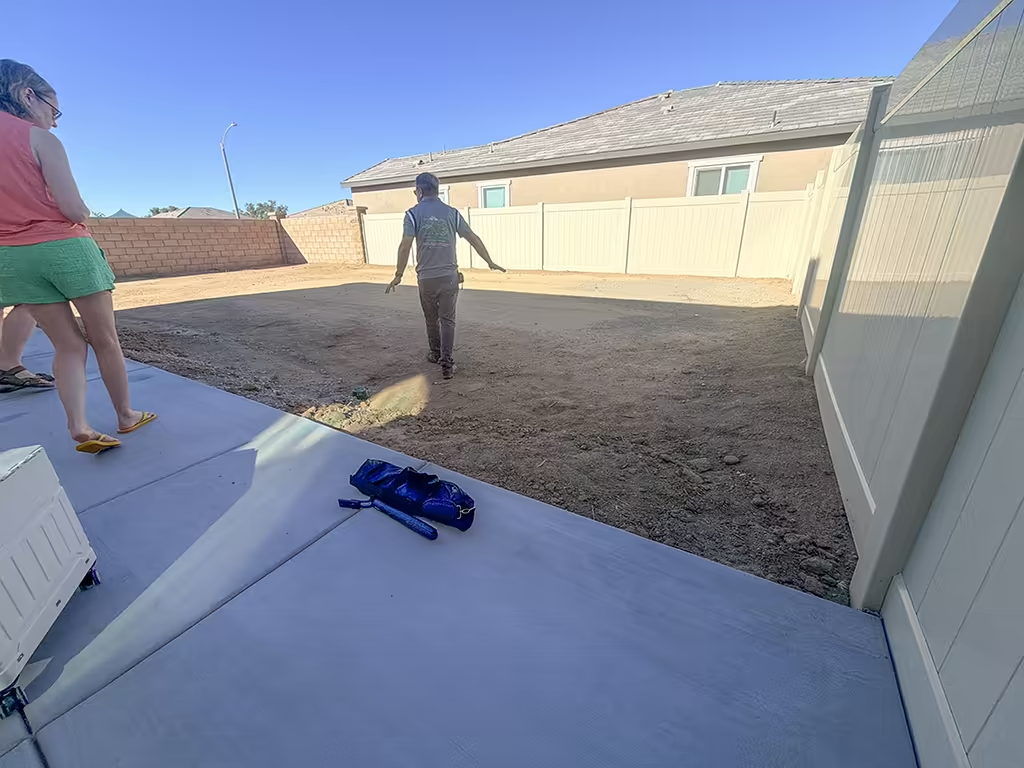
The principal site condition is the elevation transition immediately beyond the existing concrete patio. Three existing drainage grates are currently set materially below the patio elevation, with the ground dropping sharply near the concrete and then rising again farther into the yard.
__wf_reserved_inherit

Kreative Gardens will perform corrective grading using a combination of cut-and-fill and compacted aggregate base as needed to create a smoother, more usable finished surface while preserving positive drainage. The three existing drain grates will be raised and adjusted to match the new finished grade.

The intent is not to raise the entire backyard to the patio elevation. Instead, the low area will be blended into the surrounding grade so the finished landscape has a comfortable, gradual transition rather than the current pronounced trough.

The rear vinyl-fence elevation is an important grading constraint because portions of the fence are already relatively close to the patio elevation. Finished grades will therefore be established carefully to maintain appropriate clearance at the fence, preserve drainage, and avoid unnecessary fill.

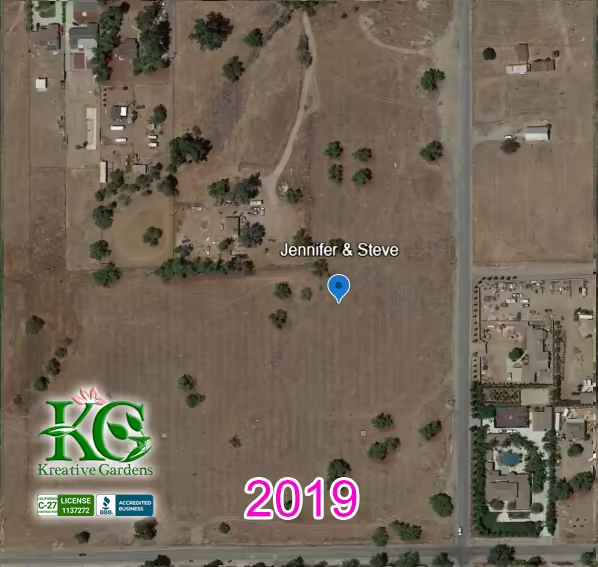
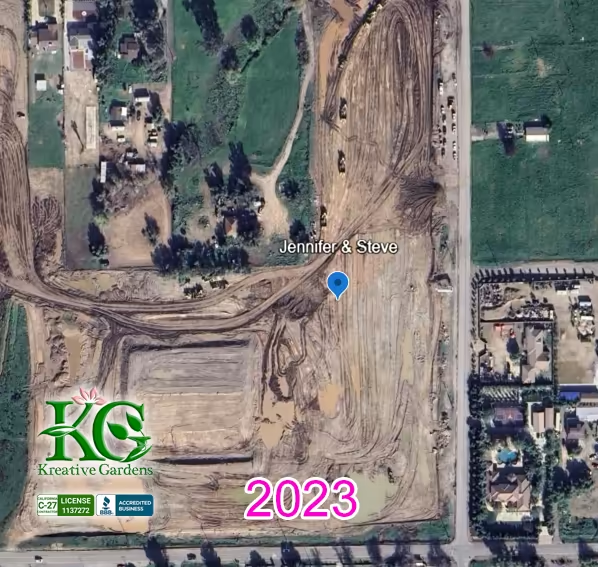
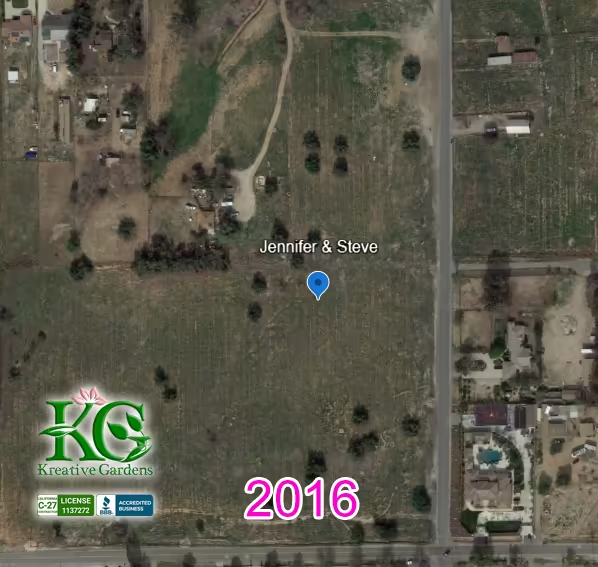
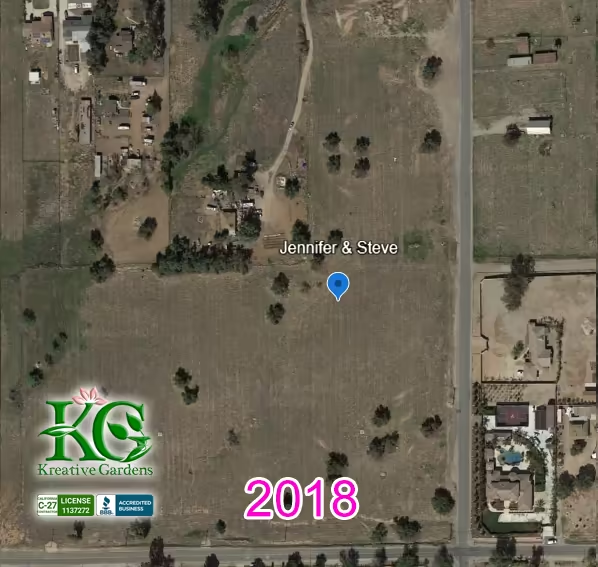
Historical aerial imagery from 2016, 2018, 2019, and 2023 was reviewed. The property remained largely undeveloped through 2019, while the 2023 imagery shows the subdivision undergoing broad site grading and earthwork before residential construction. Based on the available imagery, the major grading appears to have occurred as part of the original development work rather than through later backyard regrading. The proposal therefore assumes standard landscape preparation and compaction, subject to actual subsurface conditions encountered during installation.
__wf_reserved_inherit

Premium Desert View Artificial Turf — Approx. 1,455 sq. ft.

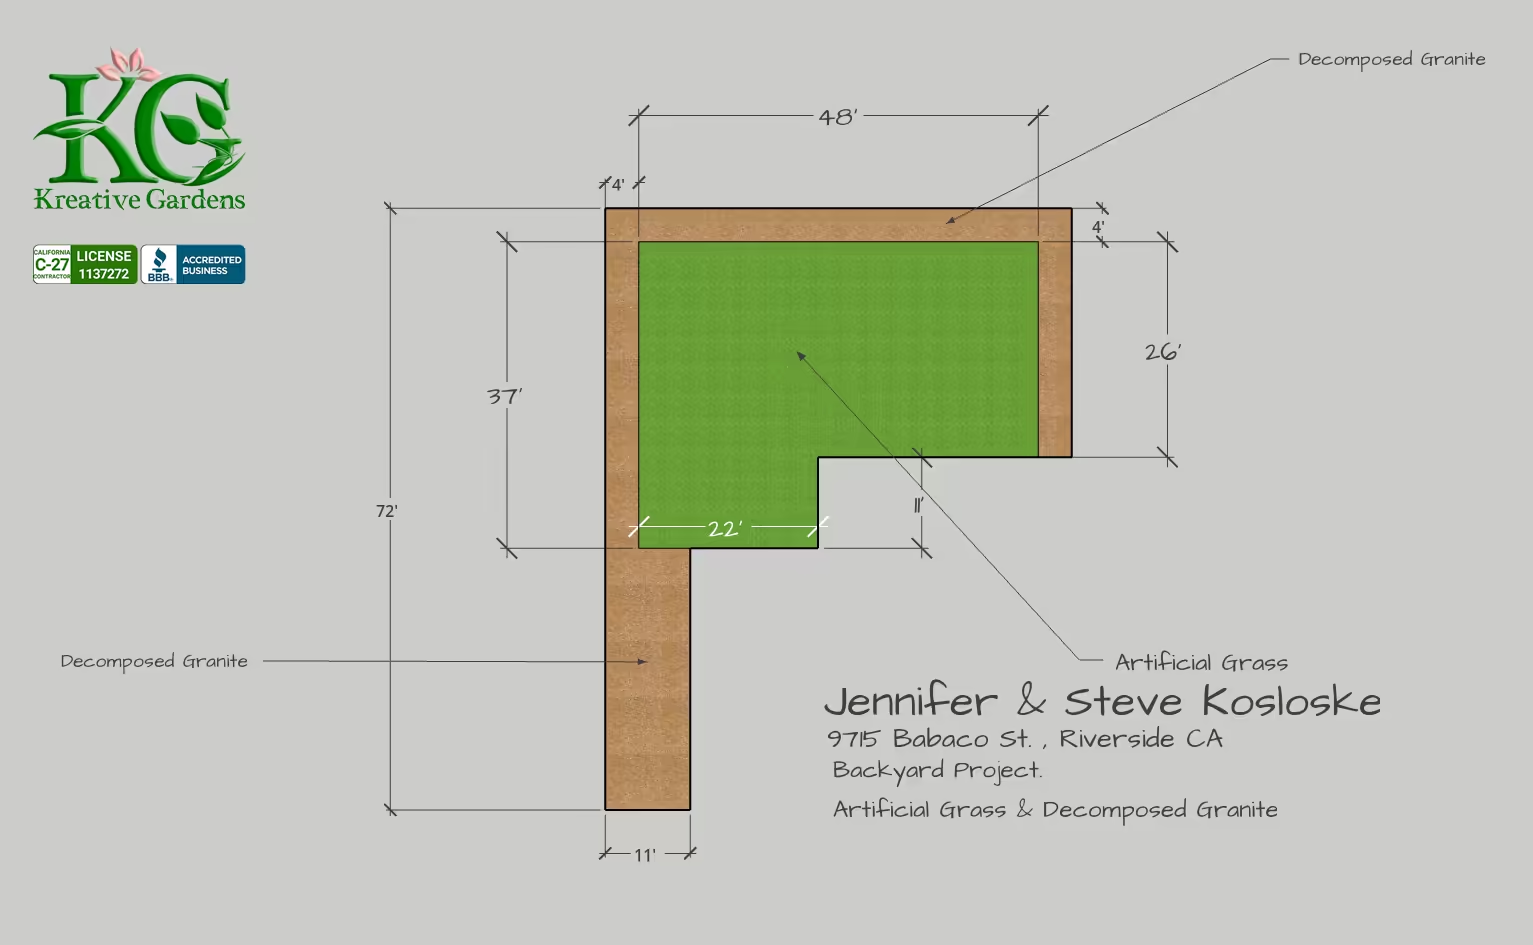
Approximately 1,455 sq. ft. of premium Desert View artificial grass will be installed in the approved central lawn area. Desert View is a premium residential/commercial landscape turf with an approximately 1.75-inch pile height, and approximately 90 oz. total weight, four-tone coloration, polyurethane finish, and high-flow drainage performance.

The selected turf system is being presented with the applicable product safety documentation available through this proposal, including the attached heavy-metal/SGS and PFAS documentation.

Installation includes excavation and preparation required to establish the approved finished elevations, commercial-grade geotextile/weed barrier, recycled Class II aggregate base, grading, moisture conditioning as needed, mechanical compaction, professional turf layout, cutting and fitting, seams where required, perimeter fastening, infill, power brushing, and final cleanup.

Camofill Infill

Instead of a conventional polyethylene-based infill, this installation will use Camofill. Camofill is being specified as part of the premium turf system, and its Safety Data Sheet is attached to this proposal for review.

__wf_reserved_inherit

Four-Foot Future Planting Border

The turf will be intentionally set back approximately 4 feet from the left, right, and rear perimeter walls/fences. These perimeter areas will be finished with California Gold decomposed granite so Jennifer and Steve have dedicated space for future planting without having to remove or modify the artificial turf later.

Composite bender board will define the turf/DG transition and will be shaped with flowing curves consistent with the approved landscape concept rather than a rigid rectangular border.

California Gold Decomposed Granite — Approx. 790 sq. ft.

Approximately 790 sq. ft. of the backyard will be finished with California Gold decomposed granite. This total includes the approximately four-foot planting border around the three perimeter sides of the turf area and an additional approximately 316 sq. ft. area on the left side toward the rear of the backyard.

The approximately 316 sq. ft. DG area is intentionally being kept flexible. Jennifer and Steve may later use it as an additional planting area or as a location for a future storage shed. The DG preparation for this area is included in the quoted project price; any future shed, foundation, anchoring, electrical work, or planting improvements would be separate.

Concrete Step Stones

Two 24 in. × 16 in. × 2 in. rectangular gray concrete step stones will be incorporated at the patio transition to provide a comfortable step-down into the finished landscape. Their final elevation and spacing will be coordinated with the corrective grading so the transition feels intentional and natural.

Planting & Future Landscape Improvements

No plants, plant procurement, planting installation, irrigation for future planting, or planting plan are included in this proposal. Jennifer and Steve indicated that they expect to address planting in the near future.

If they later provide a finalized planting or landscape plan, Kreative Gardens can review it and may be able to provide separate pricing for plant procurement, installation, irrigation modifications, or related landscape work.

Warranty

Kreative Gardens provides its standard two-year workmanship warranty. Desert View carries the applicable manufacturer warranty, subject to the manufacturer's written terms and exclusions.

Detailed Scope & Pricing by Area

Area Name
Area Sqft. or Linear
Material
Price
Two 24 in. × 16 in. × 2 in. rectangular gray concrete step stones
Other Option
Composite bender board for flowing turf/DG transitions
Other Option
California Gold decomposed granite perimeter areas
790
DG
Premium Desert View artificial turf system with Camofill infill
1455
Artificial Grass
Corrective grading and adjustment of three existing drain grates
Other Option
Curbing Lin. Ft:
Curbing Price:
Disclosure: Area measurements provided are approximate and rounded to the nearest whole number. They are intended for estimating and quoting purposes only. Actual dimensions may differ slightly during installation due to field conditions or adjustments.
Total Project Price:  $
13800.00

This all-inclusive price covers everything required for a professional and lasting installation — from premium materials and delivery to expert labor, site preparation, and final cleanup. We handle the entire process so you don’t have to coordinate with multiple contractors or worry about hidden fees. What you see is what you pay.

Cash Offer Price:  $
13000.00

Clients who choose to pay in full at the time of approval enjoy a reduced total. This offer reflects the savings we pass along by avoiding third-party financing and administrative fees — while still delivering the same high-quality results.

** This quote is valid for 15 days from the date issued. After this period, pricing and availability may be subject to change without notice.
No items found.

Zoom and Rotate

Grass Model Specifications

Selected Model

Desert View

Specifications

Yarn Color:
Finishing Coating:
Pile Height (inches:
Drainage Rate:
1.47 gal/ft²/min
Face Weight (Oz):
Application:
Total Weight (Oz)
Warranty:
Yarn Color:
Pile Height (In):
Face Weight (Oz):
Total Weight (Oz):
Finish Coating:
Drainage Rate:
1.47 gal/ft²/min
Application:
Warranty:

Procedures

Artificial Grass Installation Procedure


Artificial Grass Installation

The following outlines our complete, industry-standard installation process, which fully rebuilds the foundation that was missing from the existing system and ensures proper drainage, stability, and longevity.
‍

Our installation begins by clearing the designated area of any existing grass, debris, and organic material.
‍
The surface is then graded for proper drainage and compacted to create a stable sub-base.
‍
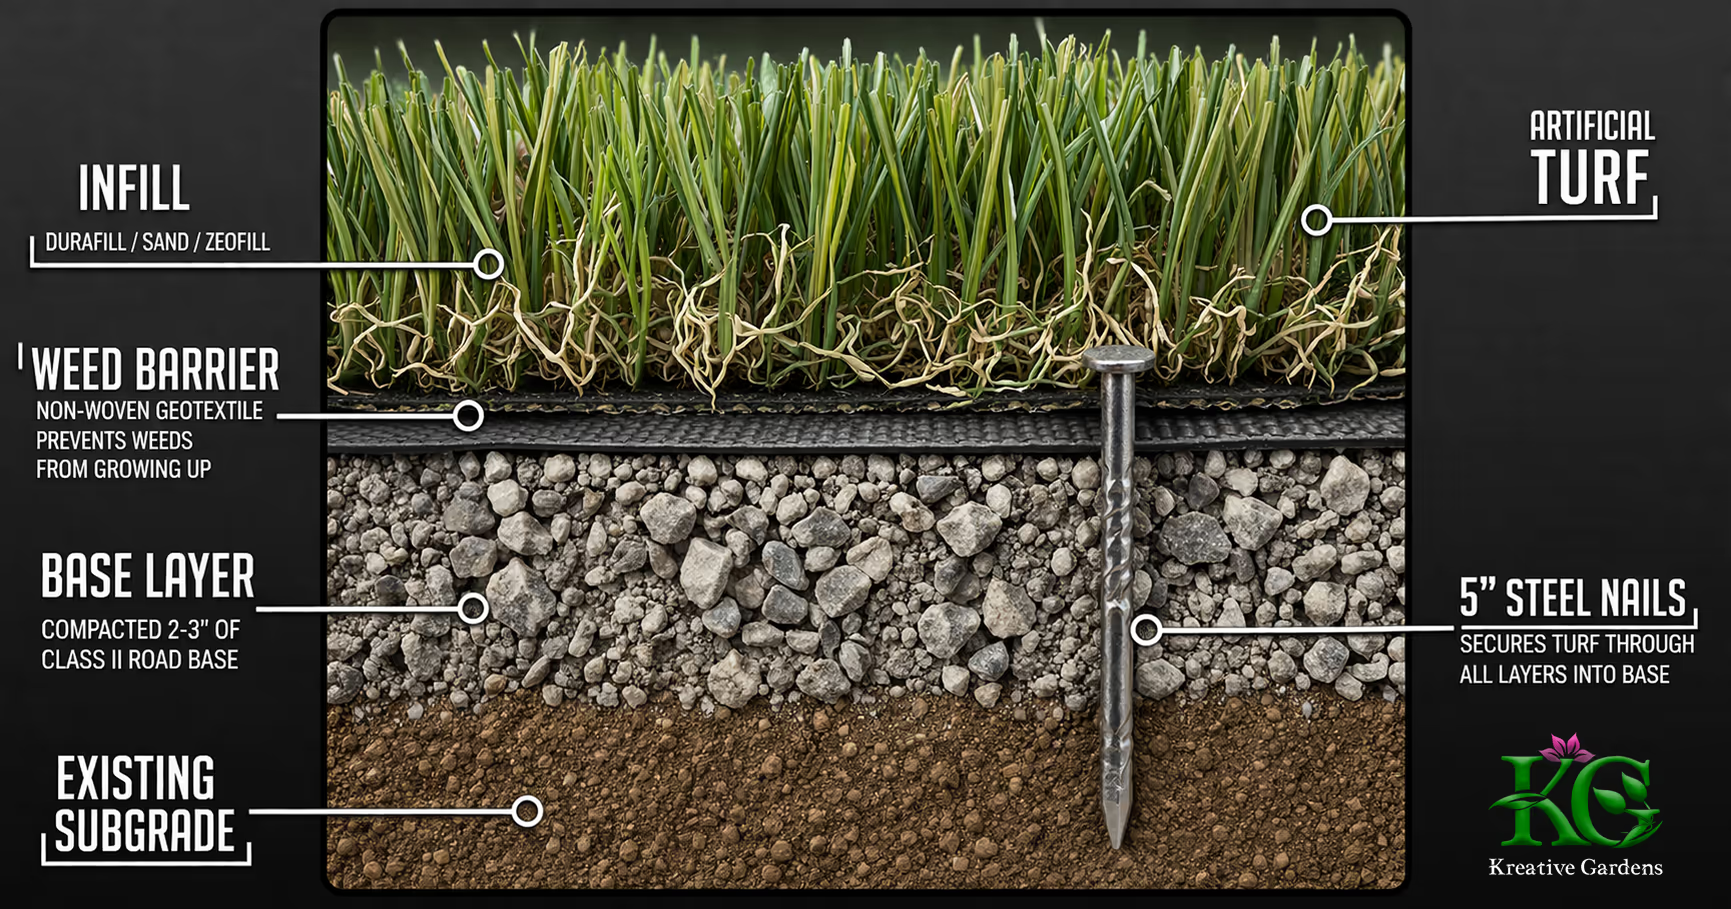
A layer of crushed aggregate is installed and compacted — usually around 2–3 inches deep, depending on soil conditions and usage requirements. The base is mechanically compacted to approximately 90–95% density to prevent future settling and maintain a stable, even surface.

Once leveled, a commercial-grade weed barrier is laid over the compacted base to help prevent weed growth while allowing for drainage.

Next, the artificial grass is carefully rolled out and trimmed to fit the design. It is secured using 5" non-galvanized nails, placed approximately every 5 inches along the perimeter and every 24 inches within the interior of the turf. Seams are carefully joined to ensure durability and visual continuity.

Finally, the turf fibers are brushed upright and infilled with a material such as silica sand, antimicrobial, odor trapping, or cooling infill, depending on the application. This step enhances stability, appearance, and longevity. The area is then cleaned and groomed for a polished finish.

Decorative Rock Installation Procedure

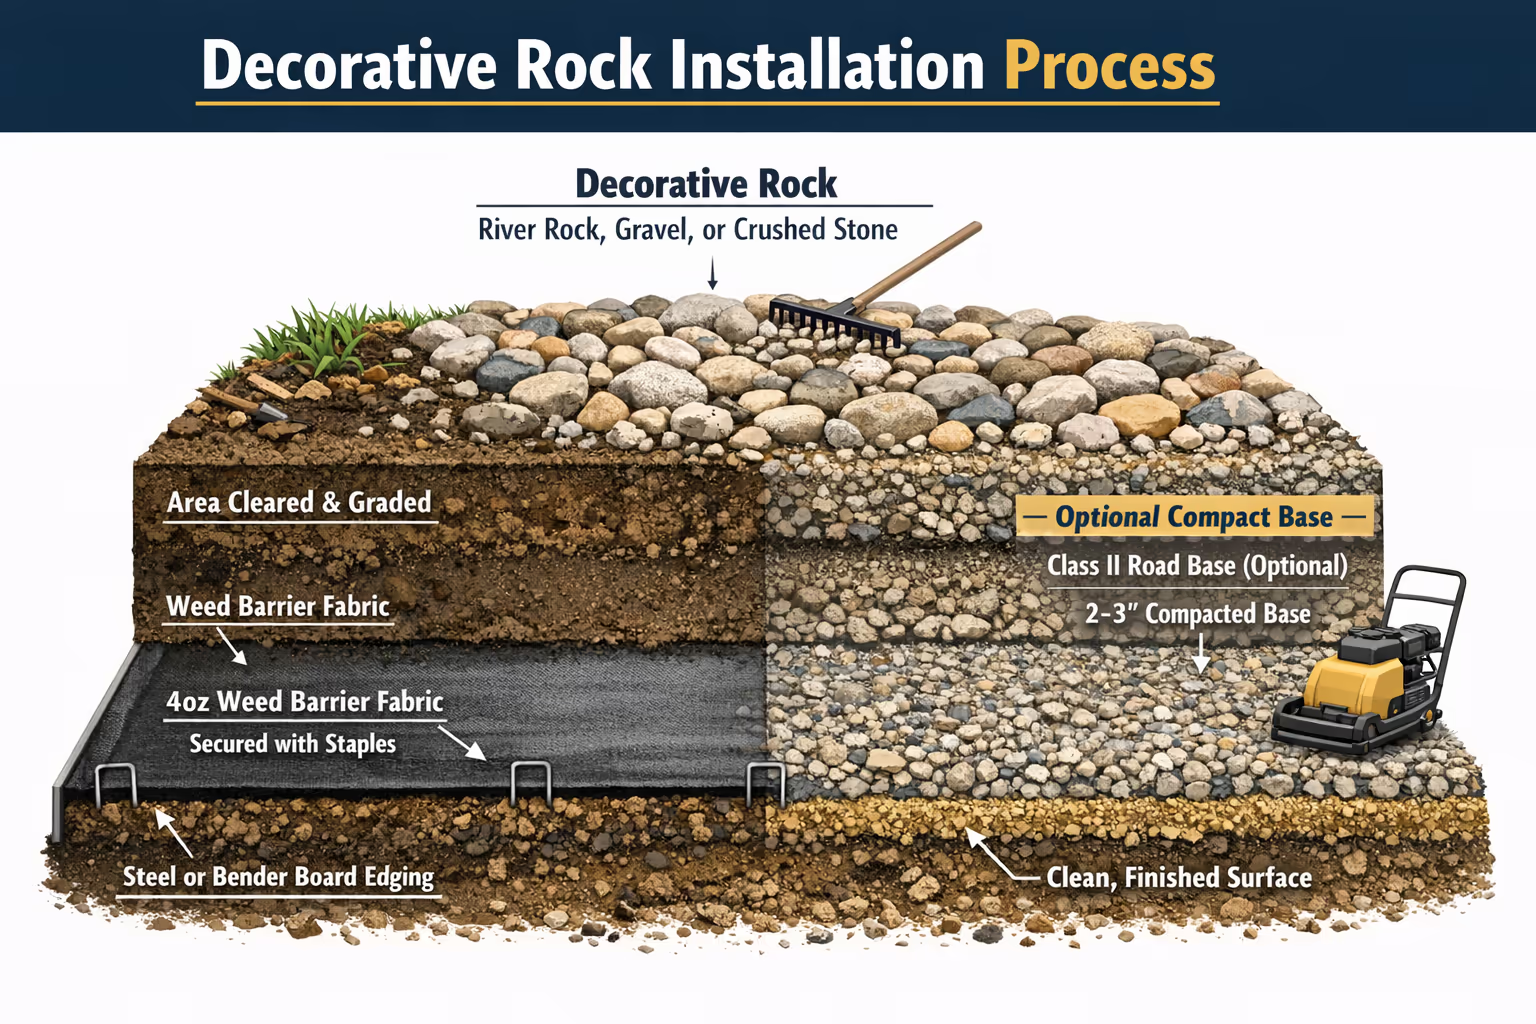
Our decorative rock installations begin by carefully outlining the designated areas and removing any existing vegetation, debris, loose soil, or obstructions that could interfere with a stable installation. In many cases, this includes removing existing decorative rock, weeds, or organic material that has accumulated over time. The area is then lightly graded to create a smooth and even subgrade, eliminating low spots where water or debris might collect.

Once the surface is prepared, we install a commercial-grade 4oz woven weed barrier fabric designed to suppress weed growth while still allowing water to drain through the soil naturally. The fabric is overlapped at seams and securely pinned using landscape staples to prevent movement over time and to ensure continuous weed protection across the entire installation area.

Depending on the site conditions and the customer’s preference, we may install an optional graded and compacted base layer, typically consisting of Class II road base. When used, this base layer is usually installed at a depth of approximately 2–3 inches and compacted with vibratory plate compactors to create a firm, stable surface.

This optional base layer offers several advantages:

• Improves long-term stability of the decorative rock
• Reduces settling and migration of the rock into the soil
• Enhances drainage and prevents muddy conditions after rain
• Provides a smoother and more level finished surface

However, in many residential decorative rock installations—particularly where soil is already firm and well-draining—the base layer may be omitted to reduce cost and installation time. In these cases, the weed barrier fabric is installed directly over the prepared soil, and the decorative rock itself provides sufficient coverage and stability for the landscape application.

After the base preparation (if selected) and weed barrier installation are complete, the chosen decorative rock—such as river rock, crushed gravel, lava rock, or other decorative aggregates—is carefully distributed across the area at the specified depth. The material is evenly spread to achieve consistent coverage and proper thickness, typically ranging from 2 to 3 inches depending on the rock size and design requirements.

The surface is then final-raked and sculpted to create a clean, professional finish with smooth transitions and an even distribution of material. Special attention is given to shaping around trees, plants, irrigation components, and architectural features to maintain both functionality and visual appeal.

If required for the design, steel edging or bender board edging is installed along borders to contain the decorative rock and clearly define landscaped areas. Edging helps maintain crisp lines between rock, turf, concrete, or planting areas and prevents rock migration over time.

The result is a low-maintenance, visually appealing landscape surface that improves drainage, reduces weed growth, and enhances the overall curb appeal of the property.

Decomposed Granite (DG) Installation Procedure

Our decomposed granite installations start with clearing the designated area of grass, roots, and debris to establish a clean and stable foundation. Once the area is excavated and leveled, we install bender board or metal edging to contain the DG and create defined borders that prevent spreading over time.

A commercial-grade weed barrier fabric is laid down to inhibit weed growth while still allowing water to permeate through. This ensures a clean, low-maintenance finish over the long term.

We then apply a base layer of compacted Class II road base or crushed rock, typically around 2–3 inches deep, depending on site conditions and expected foot traffic. This base layer is leveled and compacted using a vibratory plate compactor to provide a stable sub-surface.

Next, we spread the decomposed granite evenly across the area in lifts of approximately 1.5 inches each. After each layer is spread, we lightly moisten the surface with water to aid in compaction and binding, then use the compactor again to press it into place. This process is repeated as needed until the final desired depth—usually around 2–3 inches total—is achieved.

We use stabilized DG upon request, which includes a binding agent to help the surface resist erosion and maintain a firmer finish under traffic. The final surface is lightly misted and compacted again for a smooth, walkable, and professional finish.

Paver Installation Procedure

Our paver installations begin with thorough site preparation, which includes marking the layout, removing any vegetation, and excavating the area to a depth that accommodates the paver thickness plus the required base layers—typically 7 to 9 inches total, depending on traffic load.

We then install edge restraints (such as bender board or concrete curbing) to maintain the integrity of the layout and prevent shifting over time.

A weed barrier fabric is laid down over the subgrade to reduce weed growth without impeding drainage.Next, we apply a compacted Class II road base or ¾” crushed aggregate in lifts of approximately 2–3 inches, compacting thoroughly after each lift using a vibratory plate compactor. This base layer is usually 4 to 6 inches thick, depending on whether the application is pedestrian or vehicular.

Over the compacted base, we spread a 1-inch bedding layer of washed concrete sand or similar material. This layer is carefully screeded to create a smooth, level surface that will support the pavers evenly.

Pavers are then laid by hand, following the desired pattern (e.g., herringbone, running bond, basketweave). We use spacers or consistent joints to allow for joint sand and proper interlocking.

Once all pavers are laid, we cut edge pieces as needed using a masonry saw or splitter to achieve a clean perimeter fit. After the entire surface is in place, we compact the pavers with a vibratory plate compactor fitted with a rubber pad to avoid surface damage.

We then apply polymeric sand or regular joint sand across the surface and sweep it into the joints. Polymeric sand is preferred for its binding and weed-prevention properties. The surface is compacted once more to help settle the sand.

Finally, for polymeric sand, we lightly mist the surface to activate the binding agent, resulting in a durable, low-maintenance, and visually appealing finish.

Stepping Stones Installation Procedure

The installation of stepping stones begins with careful planning and layout, ensuring proper spacing for comfortable walking. Typically, we maintain a distance of 18 to 24 inches (center to center) between stones to match the average human stride.

We begin by marking the path and then removing any grass or vegetation in each spot where a stone will be placed. Each area is excavated individually to a depth of approximately 2 to 4 inches, depending on the thickness of the stones and desired finish height.

Next, we install a weed barrier fabric under each stone location to help prevent weed growth while allowing drainage. A compacted base layer of decomposed granite (DG), sand, or crushed gravel is then added to each cavity, typically 1 to 2 inches thick, and compacted by hand to create a stable and level foundation.

Each stepping stone is then set into place manually, ensuring it sits level with the surrounding grade and is stable under foot pressure. We use a level and rubber mallet to adjust and secure each stone. The goal is a flush finish with just enough elevation to allow water runoff and avoid pooling.

If requested or aesthetically appropriate, we fill the joints between stones with decorative gravel, bark, DG, or artificial turf strips, depending on the overall landscaping theme and drainage requirements.

Once all stepping stones are in place and stable, we conduct a final inspection and make any necessary adjustments to ensure a safe, durable, and visually balanced pathway.

Concrete Installation Procedure

Our concrete installation process for residential patios, walkways, grill pads, and light-use driveways begins with site preparation and grading. We start by marking the layout, removing any vegetation, and excavating the area to a depth of approximately 4 to 6 inches, depending on the application and soil conditions.

A Class II road base or crushed gravel layer is then installed, typically 2 to 4 inches thick, and compacted thoroughly using a vibratory plate compactor. This creates a solid and stable foundation that prevents cracking and shifting over time.

Next, forms are constructed using high-quality lumber to define the edges and maintain consistent thickness and slope. We ensure that the concrete will drain away from any structures, avoiding pooling or water damage. If necessary, expansion joints or control joints are planned and marked to minimize cracking.

We then place concrete reinforcement, usually welded wire mesh or #3 rebar on chairs, based on project needs. This reinforcement adds tensile strength to help resist cracking and shifting.

A ready-mix concrete blend is then poured on-site, typically in the 3,000–3,500 psi range, which is ideal for residential use while allowing for ease of finishing. Our crew levels and floats the concrete, followed by edging and finishing the surface based on your selected texture—broom finish, smooth trowel, or decorative stamped finish.

Control joints are cut within 24 hours to prevent future cracking due to expansion and contraction.

After the surface has cured enough for final touch-ups, we apply curing compound (if requested) and rope off the area to protect it during the curing process. Light foot traffic is typically allowed after 24–48 hours, while vehicles should avoid driving on the slab for at least 7 days.

The result is a clean, durable concrete surface, ready to support daily use, outdoor furniture, BBQ grills, and more—adding both function and elegance to your outdoor space.

Hazard Mitigation Procedure

Not Included / Exclusions

This proposal is limited to the work specifically described in the Quote Summary and approved project layout. Unless specifically added by written change order, the following are not included:

Notes:

Project Summary

The Fine Print

Before We Begin...

Please take a moment to review the details below. These notes cover important aspects of your project, such as warranties, material handling, and general terms. We believe in transparency and want you to feel confident every step of the way.

Mechanic’s Lien Warning

Mechanic's Lien Warning
Under California law, any contractor, subcontractor, laborer, supplier, or other person who helps improve your property but is not paid may record what is called a mechanic's lien on your property. A mechanic’s lien is a claim made against your property and may affect your ability to sell or refinance. This could happen even if you have paid your contractor in full.To protect yourself, you should request a Lien Release from all contractors and subcontractors after work is completed.

Change Order Clause

Change Orders
‍
Any additions or modifications to the scope of work must be documented in a written change order, signed by both parties before additional work is performed. Change orders may result in additional charges and could impact the project timeline.

Cancellation Policy

Right to Cancel
‍
You may cancel this agreement within three (3) business days of signing without penalty, as required by California state law. After this period, cancellations may be subject to forfeiture of any paid deposit, restocking fees, and/or costs incurred by the contractor up to the date of cancellation.

Payment Terms

Payments
‍
A deposit is due upon approval of the quote. Balance is due upon project completion unless otherwise agreed in writing. Accepted payment methods include cash, check, Zelle, or debit/credit (fees may apply). Failure to remit final payment may result in collections or lien proceedings.

Delays or Access Issues

Project Delays or Access Restrictions
‍
The client is responsible for ensuring access to the work area. Unforeseen delays due to weather, access, hidden utilities, or client-caused schedule changes may result in rescheduling and additional costs.

Pricing Validity

This quote is valid for 15 calendar days. After that, pricing may need to be adjusted to reflect current material or labor costs. We recommend confirming your project promptly to lock in this rate.

Legal Jurisdiction

Governing Law
‍
This agreement shall be governed by and interpreted in accordance with the laws of the State of California. Any disputes shall be resolved in San Bernardino County, California.

Jennifer & Steve Kosloske
Please confirm your response to this quote:
Thank you! Your submission has been received!
Oops! Something went wrong while submitting the form.

Project Resources

Infill MSDSPFASHeavy Metals