Procedures
Artificial Grass Installation Procedure
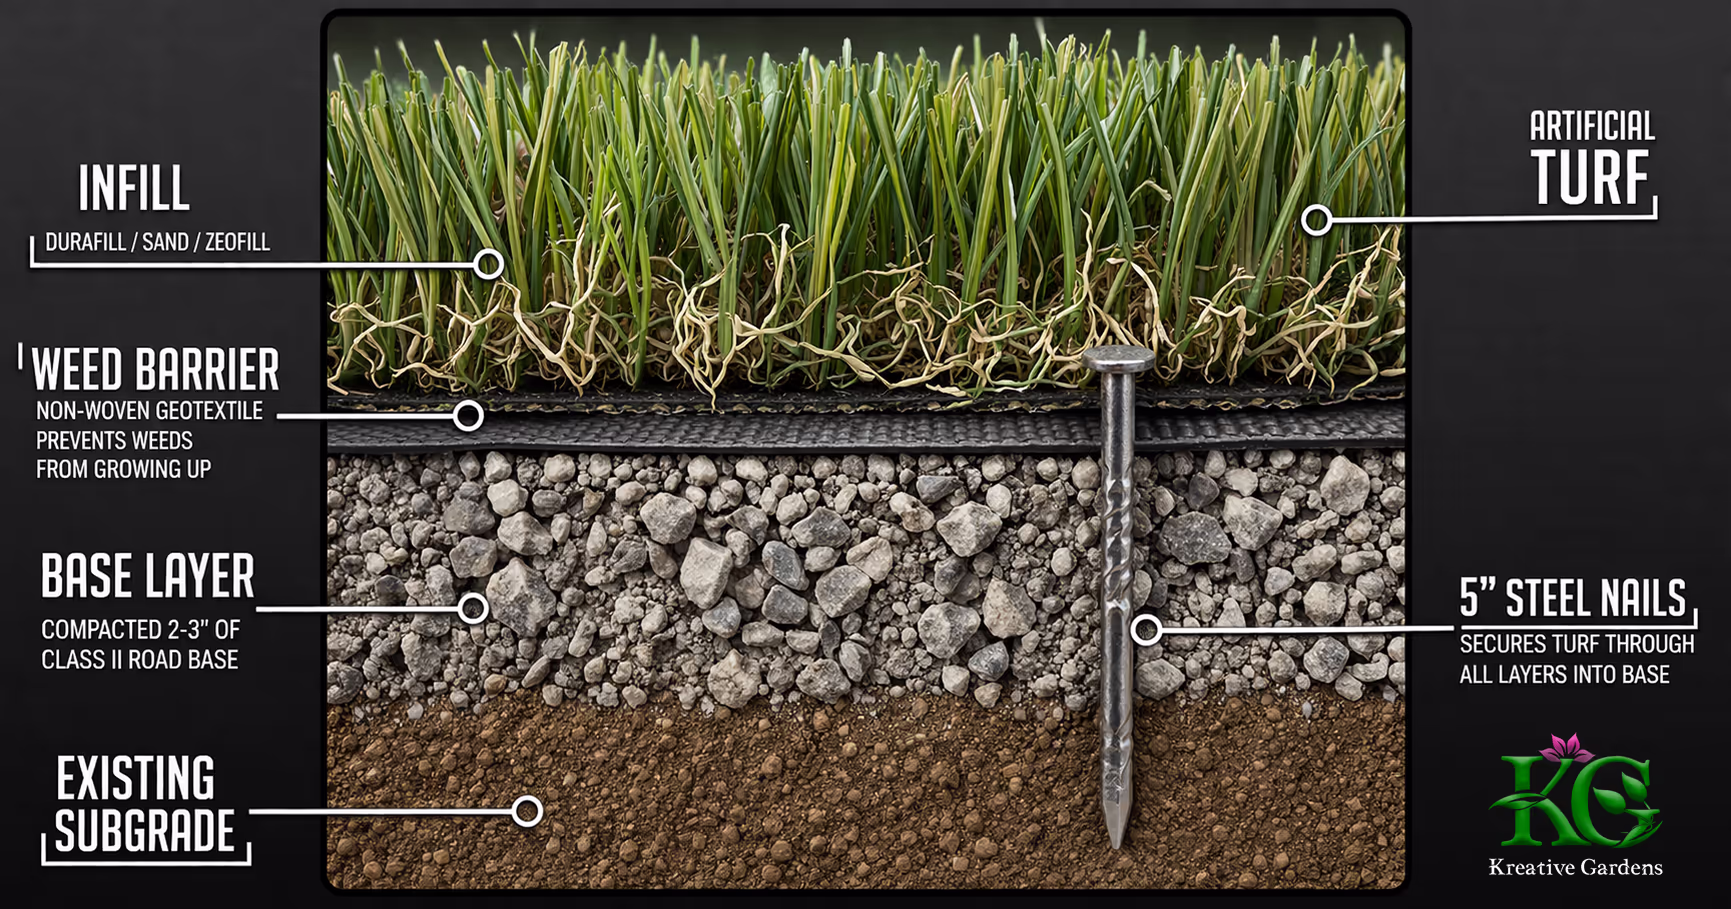
Artificial Grass Installation
The following outlines our complete, industry-standard installation process, which fully rebuilds the foundation that was missing from the existing system and ensures proper drainage, stability, and longevity.
Our installation begins by clearing the designated area of any existing grass, debris, and organic material.
The surface is then graded for proper drainage and compacted to create a stable sub-base.
A layer of crushed aggregate is installed and compacted — usually around 2–3 inches deep, depending on soil conditions and usage requirements. The base is mechanically compacted to approximately 90–95% density to prevent future settling and maintain a stable, even surface.
Once leveled, a commercial-grade weed barrier is laid over the compacted base to help prevent weed growth while allowing for drainage.
Next, the artificial grass is carefully rolled out and trimmed to fit the design. It is secured using 5" non-galvanized nails, placed approximately every 5 inches along the perimeter and every 12 inches within the interior of the turf. Seams are carefully joined to ensure durability and visual continuity.
Finally, the turf fibers are brushed upright and infilled with a material such as silica sand, antimicrobial, odor trapping, or cooling infill, depending on the application. This step enhances stability, appearance, and longevity. The area is then cleaned and groomed for a polished finish.
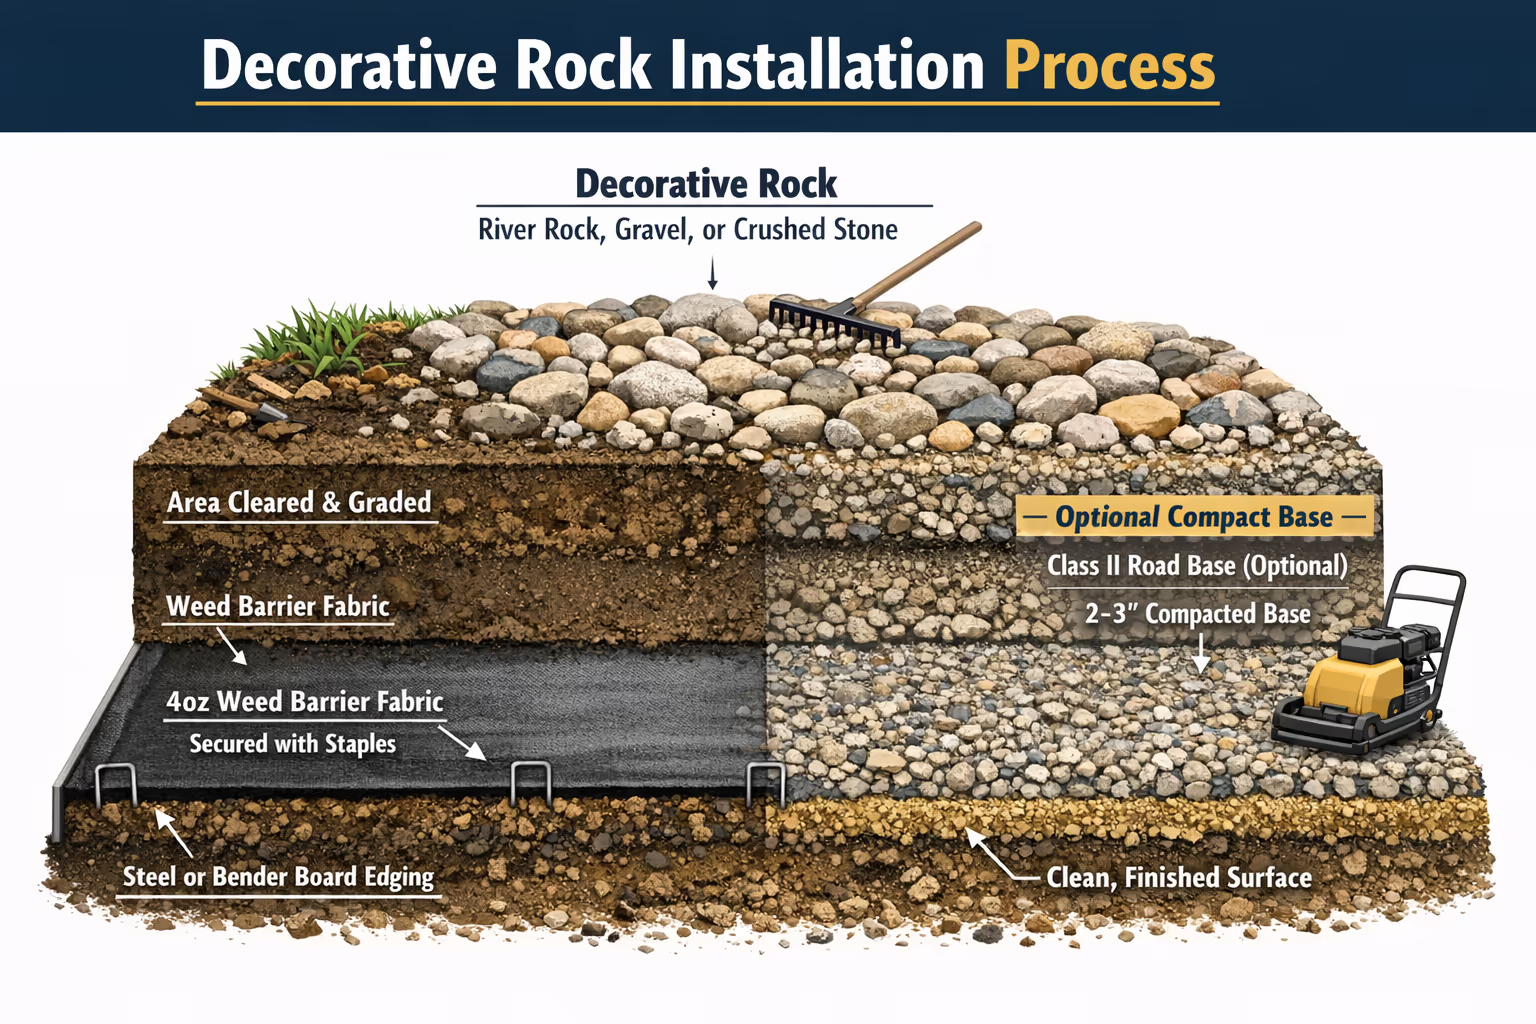
Decorative Rock Installation Procedure
Our decorative rock installations begin by carefully outlining the designated areas and removing any existing vegetation, debris, loose soil, or obstructions that could interfere with a stable installation. In many cases, this includes removing existing decorative rock, weeds, or organic material that has accumulated over time. The area is then lightly graded to create a smooth and even subgrade, eliminating low spots where water or debris might collect.
Once the surface is prepared, we install a commercial-grade 4oz woven weed barrier fabric designed to suppress weed growth while still allowing water to drain through the soil naturally. The fabric is overlapped at seams and securely pinned using landscape staples to prevent movement over time and to ensure continuous weed protection across the entire installation area.
Depending on the site conditions and the customer’s preference, we may install an optional graded and compacted base layer, typically consisting of Class II road base. When used, this base layer is usually installed at a depth of approximately 2–3 inches and compacted with vibratory plate compactors to create a firm, stable surface.
This optional base layer offers several advantages:
• Improves long-term stability of the decorative rock
• Reduces settling and migration of the rock into the soil
• Enhances drainage and prevents muddy conditions after rain
• Provides a smoother and more level finished surface
However, in many residential decorative rock installations—particularly where soil is already firm and well-draining—the base layer may be omitted to reduce cost and installation time. In these cases, the weed barrier fabric is installed directly over the prepared soil, and the decorative rock itself provides sufficient coverage and stability for the landscape application.
After the base preparation (if selected) and weed barrier installation are complete, the chosen decorative rock—such as river rock, crushed gravel, lava rock, or other decorative aggregates—is carefully distributed across the area at the specified depth. The material is evenly spread to achieve consistent coverage and proper thickness, typically ranging from 2 to 3 inches depending on the rock size and design requirements.
The surface is then final-raked and sculpted to create a clean, professional finish with smooth transitions and an even distribution of material. Special attention is given to shaping around trees, plants, irrigation components, and architectural features to maintain both functionality and visual appeal.
If required for the design, steel edging or bender board edging is installed along borders to contain the decorative rock and clearly define landscaped areas. Edging helps maintain crisp lines between rock, turf, concrete, or planting areas and prevents rock migration over time.
The result is a low-maintenance, visually appealing landscape surface that improves drainage, reduces weed growth, and enhances the overall curb appeal of the property.
Decomposed Granite (DG) Installation Procedure
Our decomposed granite installations start with clearing the designated area of grass, roots, and debris to establish a clean and stable foundation. Once the area is excavated and leveled, we install bender board or metal edging to contain the DG and create defined borders that prevent spreading over time.
A commercial-grade weed barrier fabric is laid down to inhibit weed growth while still allowing water to permeate through. This ensures a clean, low-maintenance finish over the long term.
We then apply a base layer of compacted Class II road base or crushed rock, typically around 2–3 inches deep, depending on site conditions and expected foot traffic. This base layer is leveled and compacted using a vibratory plate compactor to provide a stable sub-surface.
Next, we spread the decomposed granite evenly across the area in lifts of approximately 1.5 inches each. After each layer is spread, we lightly moisten the surface with water to aid in compaction and binding, then use the compactor again to press it into place. This process is repeated as needed until the final desired depth—usually around 2–3 inches total—is achieved.
We use stabilized DG upon request, which includes a binding agent to help the surface resist erosion and maintain a firmer finish under traffic. The final surface is lightly misted and compacted again for a smooth, walkable, and professional finish.
Paver Installation Procedure
Our paver installations begin with thorough site preparation, which includes marking the layout, removing any vegetation, and excavating the area to a depth that accommodates the paver thickness plus the required base layers—typically 7 to 9 inches total, depending on traffic load.
We then install edge restraints (such as bender board or concrete curbing) to maintain the integrity of the layout and prevent shifting over time.
A weed barrier fabric is laid down over the subgrade to reduce weed growth without impeding drainage.Next, we apply a compacted Class II road base or ¾” crushed aggregate in lifts of approximately 2–3 inches, compacting thoroughly after each lift using a vibratory plate compactor. This base layer is usually 4 to 6 inches thick, depending on whether the application is pedestrian or vehicular.
Over the compacted base, we spread a 1-inch bedding layer of washed concrete sand or similar material. This layer is carefully screeded to create a smooth, level surface that will support the pavers evenly.
Pavers are then laid by hand, following the desired pattern (e.g., herringbone, running bond, basketweave). We use spacers or consistent joints to allow for joint sand and proper interlocking.
Once all pavers are laid, we cut edge pieces as needed using a masonry saw or splitter to achieve a clean perimeter fit. After the entire surface is in place, we compact the pavers with a vibratory plate compactor fitted with a rubber pad to avoid surface damage.
We then apply polymeric sand or regular joint sand across the surface and sweep it into the joints. Polymeric sand is preferred for its binding and weed-prevention properties. The surface is compacted once more to help settle the sand.
Finally, for polymeric sand, we lightly mist the surface to activate the binding agent, resulting in a durable, low-maintenance, and visually appealing finish.
Stepping Stones Installation Procedure
The installation of stepping stones begins with careful planning and layout, ensuring proper spacing for comfortable walking. Typically, we maintain a distance of 18 to 24 inches (center to center) between stones to match the average human stride.
We begin by marking the path and then removing any grass or vegetation in each spot where a stone will be placed. Each area is excavated individually to a depth of approximately 2 to 4 inches, depending on the thickness of the stones and desired finish height.
Next, we install a weed barrier fabric under each stone location to help prevent weed growth while allowing drainage. A compacted base layer of decomposed granite (DG), sand, or crushed gravel is then added to each cavity, typically 1 to 2 inches thick, and compacted by hand to create a stable and level foundation.
Each stepping stone is then set into place manually, ensuring it sits level with the surrounding grade and is stable under foot pressure. We use a level and rubber mallet to adjust and secure each stone. The goal is a flush finish with just enough elevation to allow water runoff and avoid pooling.
If requested or aesthetically appropriate, we fill the joints between stones with decorative gravel, bark, DG, or artificial turf strips, depending on the overall landscaping theme and drainage requirements.
Once all stepping stones are in place and stable, we conduct a final inspection and make any necessary adjustments to ensure a safe, durable, and visually balanced pathway.
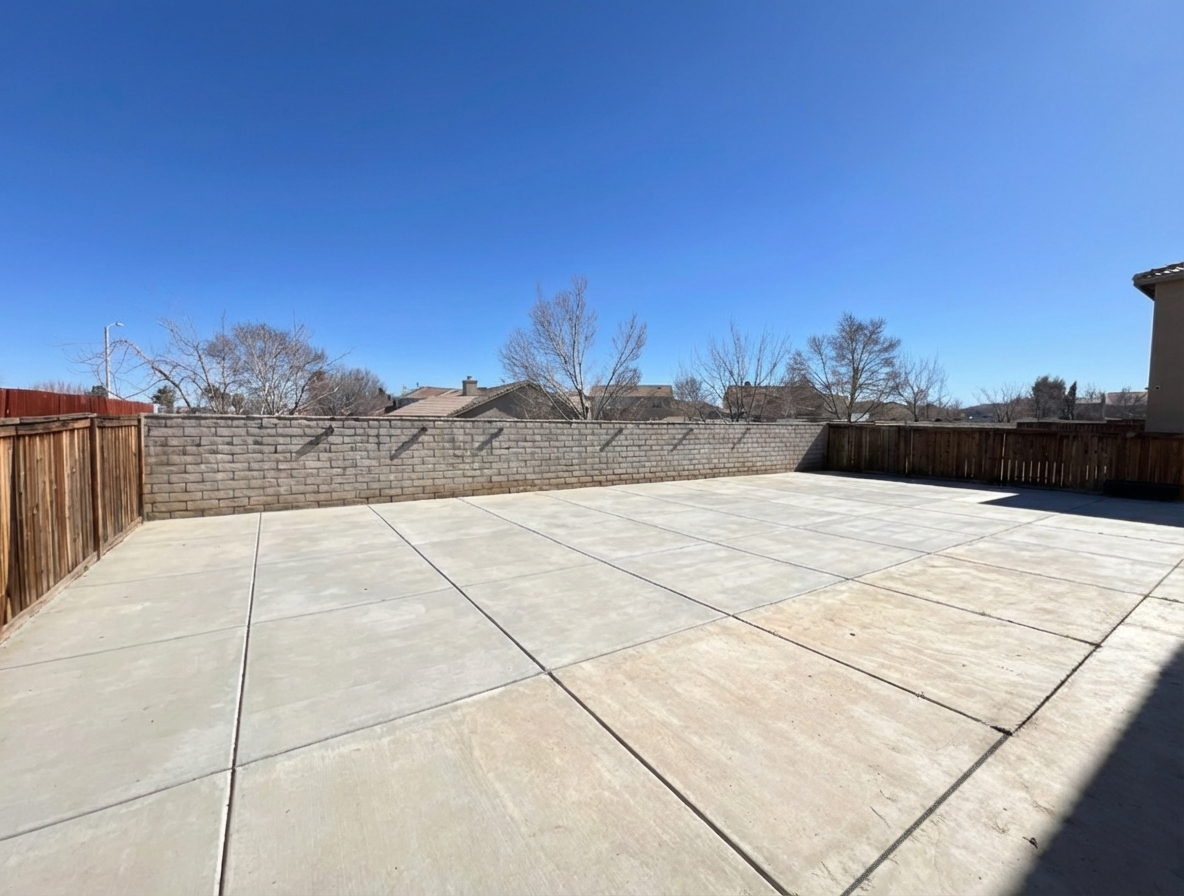
Concrete Installation Procedure
Our concrete installation process for residential patios, walkways, grill pads, and light-use driveways begins with site preparation and grading. We start by marking the layout, removing any vegetation, and excavating the area to a depth of approximately 4 to 6 inches, depending on the application and soil conditions.
A Class II road base or crushed gravel layer is then installed, typically 2 to 4 inches thick, and compacted thoroughly using a vibratory plate compactor. This creates a solid and stable foundation that prevents cracking and shifting over time.
Next, forms are constructed using high-quality lumber to define the edges and maintain consistent thickness and slope. We ensure that the concrete will drain away from any structures, avoiding pooling or water damage. If necessary, expansion joints or control joints are planned and marked to minimize cracking.
We then place concrete reinforcement, usually welded wire mesh or #3 rebar on chairs, based on project needs. This reinforcement adds tensile strength to help resist cracking and shifting.
A ready-mix concrete blend is then poured on-site, typically in the 3,000–3,500 psi range, which is ideal for residential use while allowing for ease of finishing. Our crew levels and floats the concrete, followed by edging and finishing the surface based on your selected texture—broom finish, smooth trowel, or decorative stamped finish.
Control joints are cut within 24 hours to prevent future cracking due to expansion and contraction.
After the surface has cured enough for final touch-ups, we apply curing compound (if requested) and rope off the area to protect it during the curing process. Light foot traffic is typically allowed after 24–48 hours, while vehicles should avoid driving on the slab for at least 7 days.
The result is a clean, durable concrete surface, ready to support daily use, outdoor furniture, BBQ grills, and more—adding both function and elegance to your outdoor space.
Hazard Mitigation Procedure