Kreative Gardens
Here’s a strong CMS Quote Summary draft:
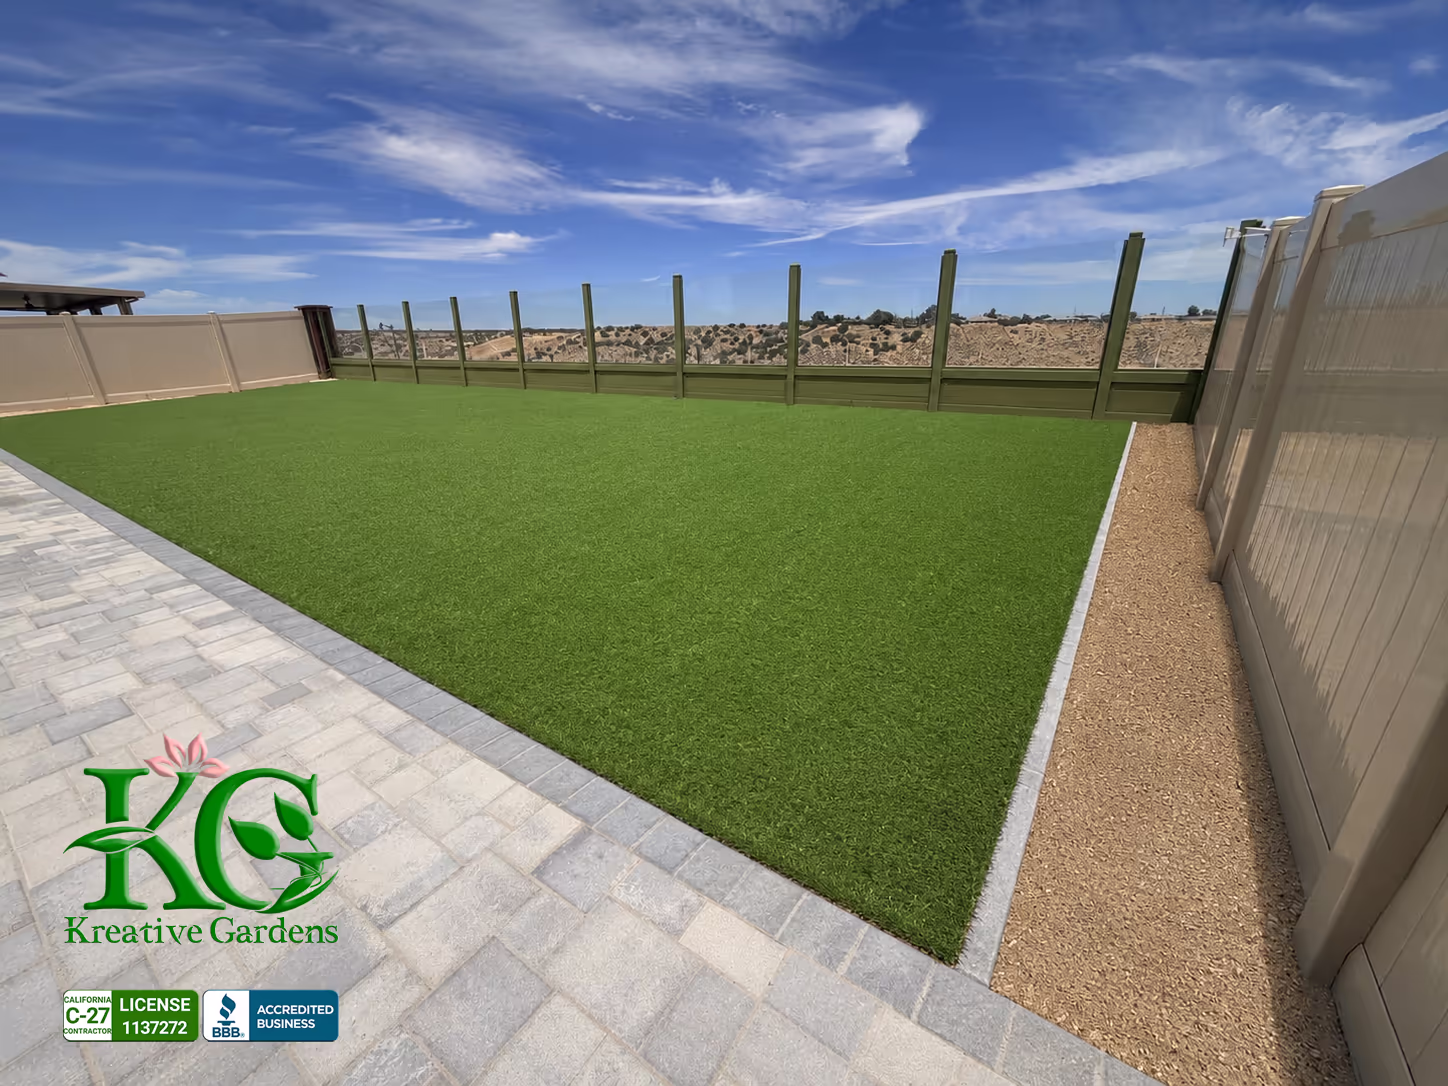
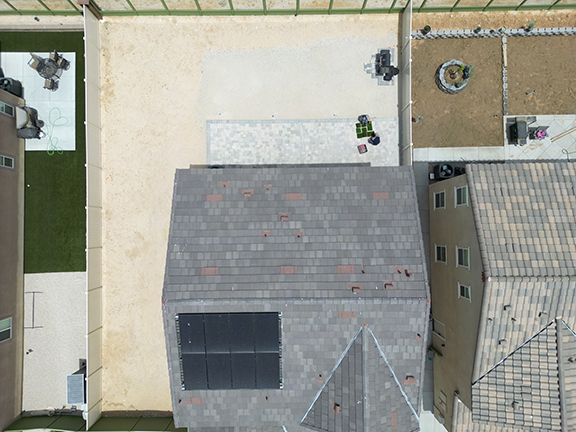
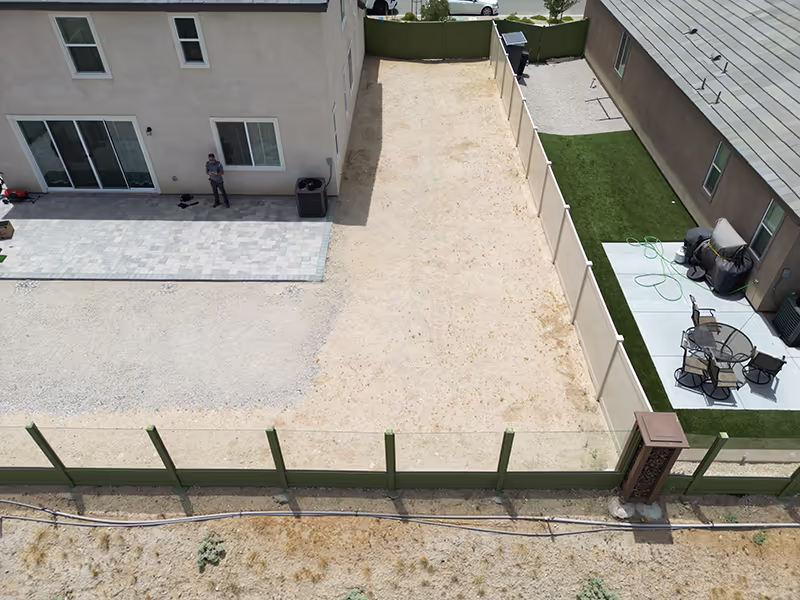
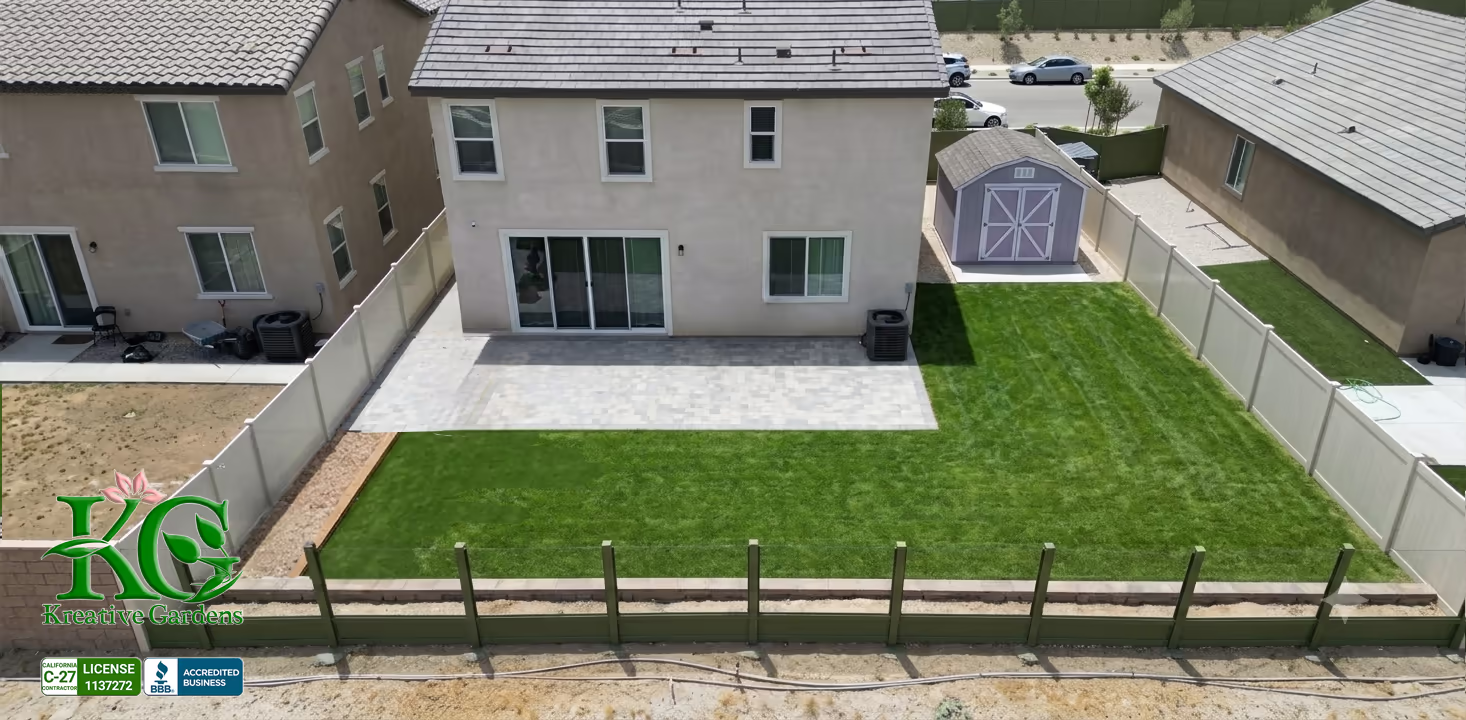
Kreative Gardens will transform the existing dirt backyard into a finished, functional landscape combining artificial grass, decorative rock/DG areas, shed foundation preparation, and a rear planter/retaining wall feature.
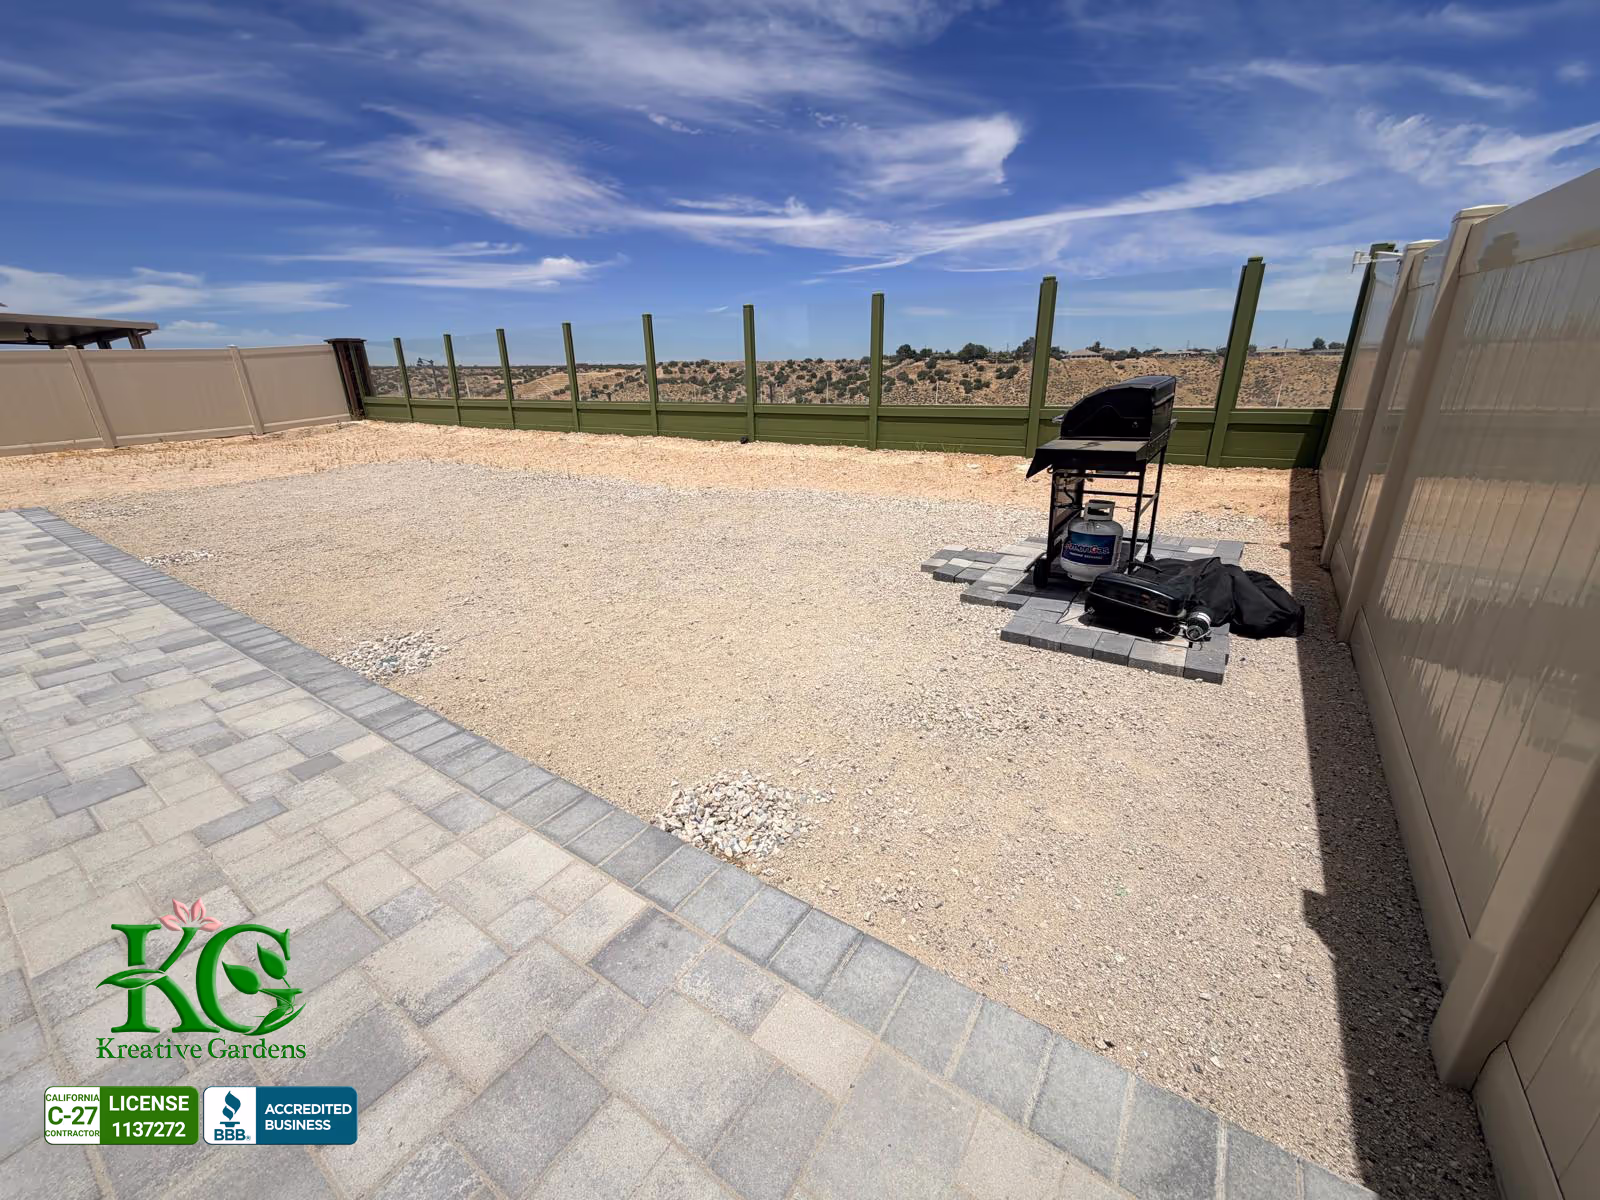
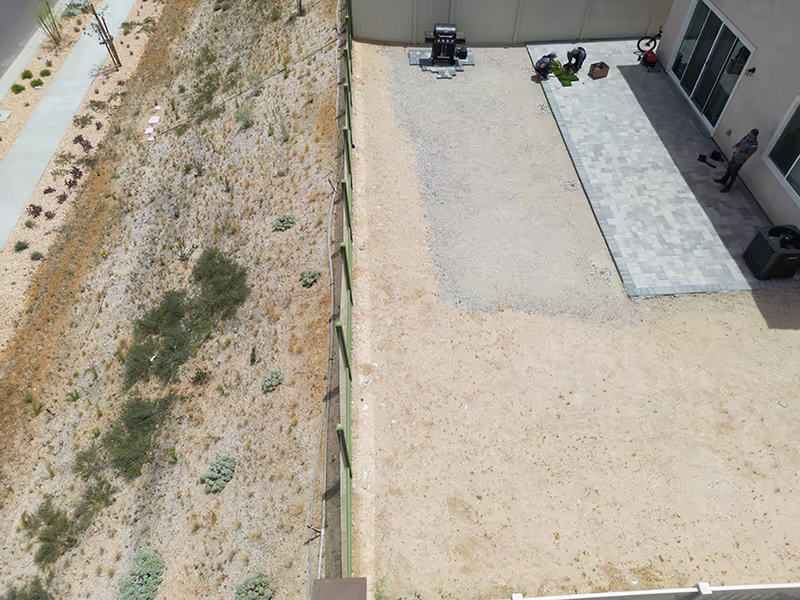
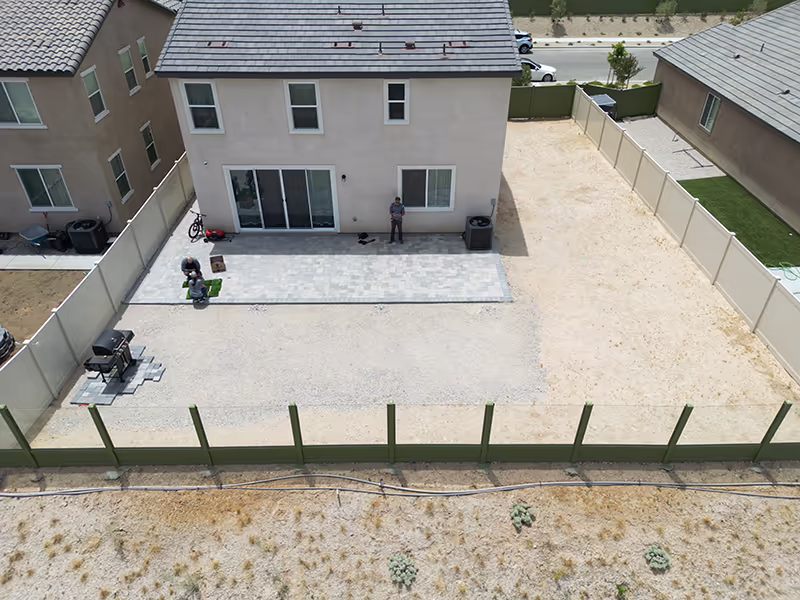
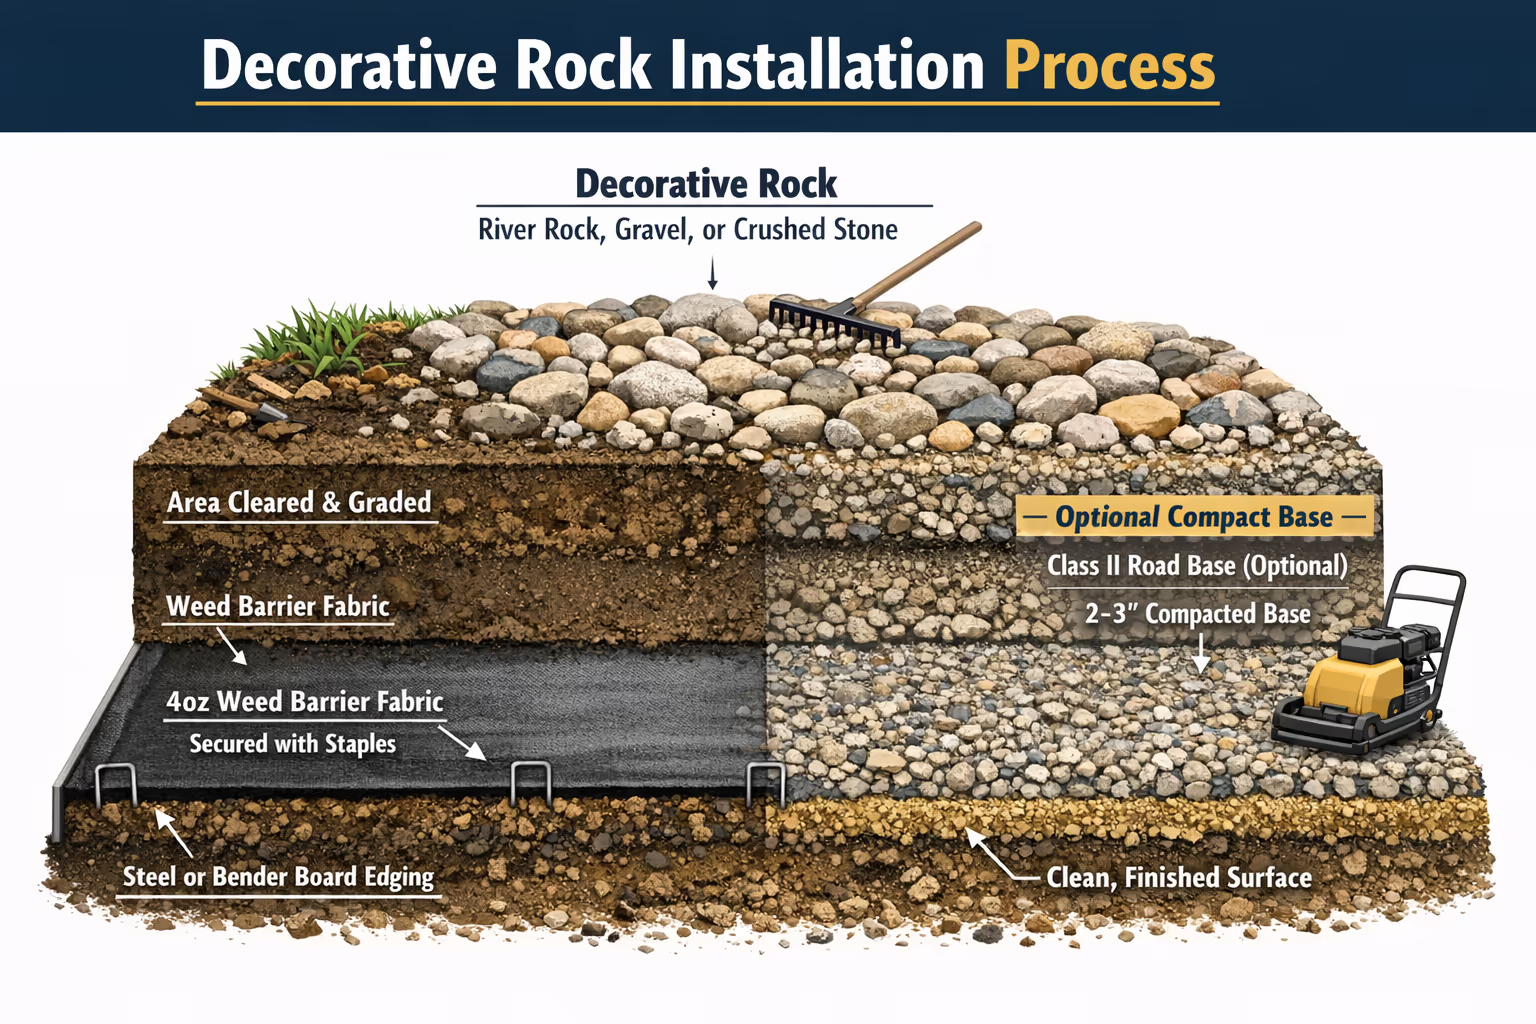
Scope includes installation of approximately 2,030 sqft of artificial grass, a 2’6” wide DG or decorative rock border along the left side, and a dedicated shed pad area using 24” x 24” pavers with a surrounding 2’6” DG border on the sides and rear.
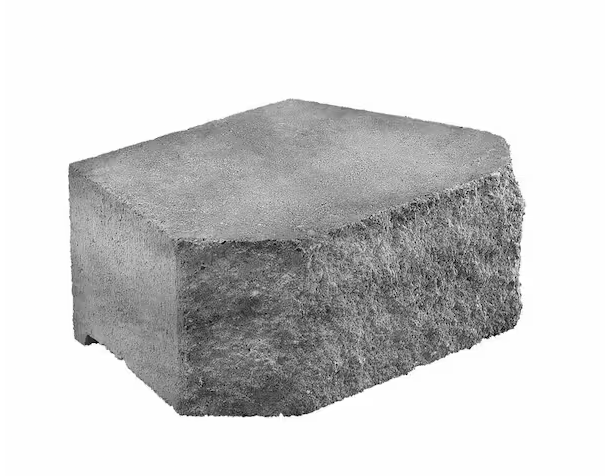
Along the rear fence, we will build a low retaining/planter wall using 12” x 8” x 3.5” gray charcoal concrete retaining wall blocks. The void area between the wall and rear fence will be filled with compacted Class II base and finished with approximately 1”–2” of decorative rock, creating a cleaner, more stable, and intentional buffer zone along the rear property line.
Customer expressed concerns regarding possible ground movement or settlement within the property. Contractor is not a geotechnical engineer and makes no representations regarding soil stability, subsurface conditions, settlement, drainage, compaction, structural movement, or future soil performance. Proposal and pricing are based solely on visible site conditions observed at the time of inspection.
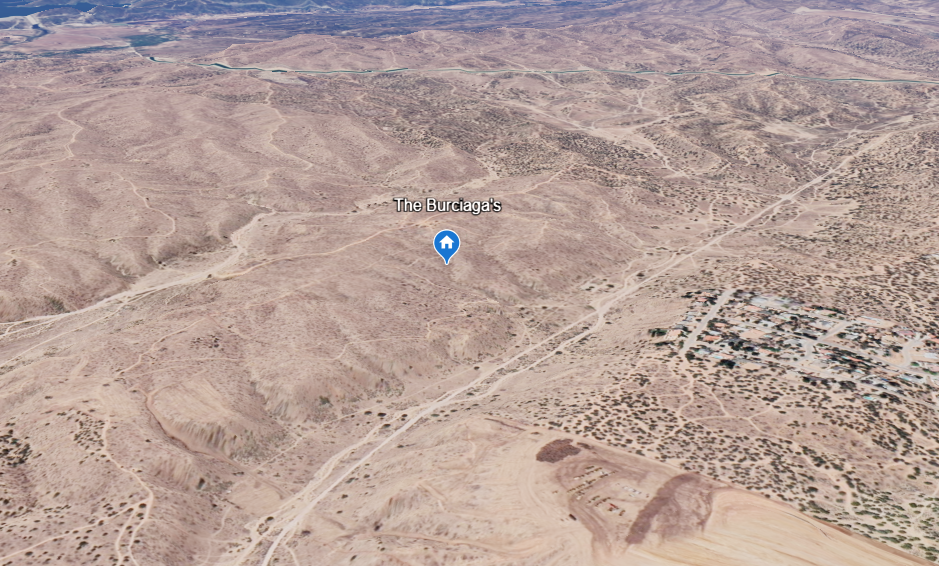
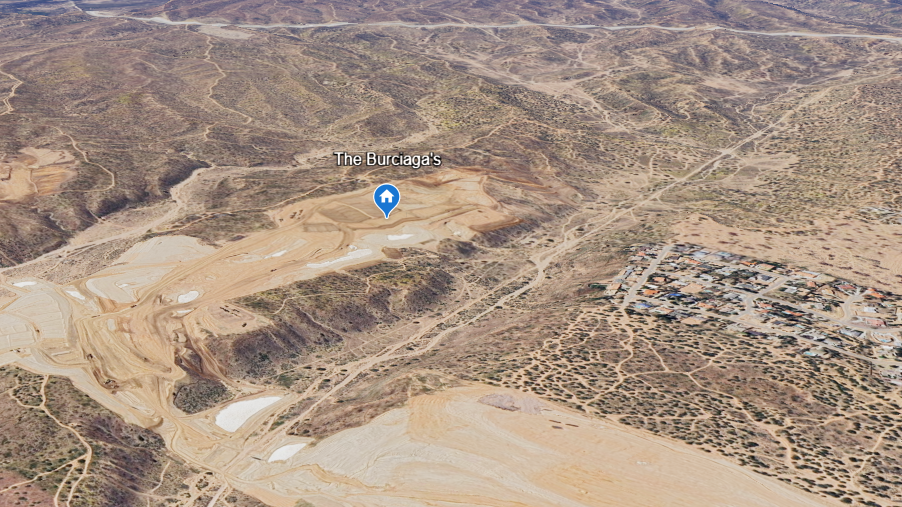
As part of the site review, historical aerial imagery of the area prior to development was examined. The imagery appears to show naturally rolling desert terrain that was subsequently mass-graded during construction of the subdivision, which is standard practice for new residential developments. No obvious evidence was observed indicating that the subject property was originally located within a large ravine, canyon, or depression that was simply filled prior to construction. Any determination regarding soil stability, settlement, grading practices, compaction, or long-term performance of the building pad should be directed to the builder, developer, or a licensed geotechnical engineer.
Property is located within a recently developed subdivision. Pricing is based on visible site conditions at the time of inspection. Contractor has observed no obvious signs of abnormal settlement during the site visit; however, contractor makes no representation regarding soil conditions, subsurface compaction, drainage performance, settlement, or future ground movement. Any unforeseen subsurface conditions discovered during construction may require a change order.
Construction of an approximately 61 linear foot retaining/planter wall located along the rear portion of the property. Wall to be constructed using 12" x 8" x 3.5" Gray Charcoal Concrete Retaining Wall Blocks and installed approximately 2'6" from the existing rear fence line.
Wall height is planned at approximately 18" above finished grade. Installation includes excavation, preparation of a compacted Class II aggregate base, placement of retaining wall blocks, alignment, leveling, and backfilling as required.
The area between the retaining wall and existing fence will be filled with compacted Class II base material and finished with approximately 1"–2" of decorative rock, creating a clean, accessible buffer zone between the landscape improvements and the rear fence line.
Customer expressed concern regarding visible soil loss beneath portions of the rear fence and the possibility of erosion or future settlement. Based on visual observations, the proposed retaining wall will create a defined landscape feature, establish a finished transition along the rear property line, and provide a contained area for decorative rock and future maintenance.
However, the proposed retaining wall is not intended to stabilize, reinforce, or remediate conditions occurring beyond the property line or on adjacent slopes. If the observed soil loss beneath the fence is being caused by conditions outside the property, such as drainage, settlement, or erosion occurring on the downslope side of the fence, construction of the retaining wall may not prevent those conditions from continuing.
If the primary objective is protection against possible future erosion beneath the fence, the customer may wish to consult with the builder, developer, HOA, or a licensed geotechnical engineer before proceeding with construction of the wall. The retaining wall should be viewed primarily as a landscape and grade-transition feature rather than a geotechnical stabilization measure.
Creation of an approximately 2'6" wide border along the east property line. The border will be separated from the artificial grass area using pressure-treated 2"x4" landscape edging installed to establish a clean and defined transition.
Border area to be finished with either decomposed granite (DG) or decorative rock, as selected by the customer. Installation includes site preparation, weed barrier fabric where applicable, finish material placement, grading, and final cleanup.
This border provides a maintenance-friendly transition between the artificial grass and the fence line while creating a clean, finished appearance throughout the side of the yard.
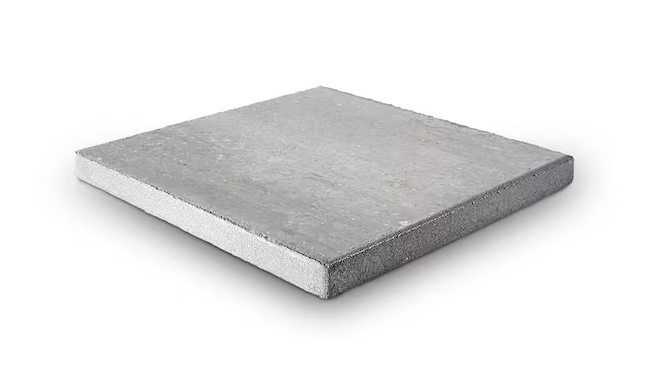
Construction of a dedicated shed foundation area using large-format 24" x 24" concrete pavers installed over a properly prepared and compacted aggregate base. Area will be graded, leveled, and compacted to provide a stable surface suitable for placement of a future storage shed.
Installation includes excavation as required, compacted Class II aggregate base, bedding sand, paver placement, alignment, leveling, and joint stabilization. The finished surface will provide a clean, durable, and immediately usable foundation without the curing time associated with a traditional concrete slab.
To enhance the appearance of the installation and provide a maintenance-friendly transition around the structure, a decomposed granite (DG) border approximately 2'6" wide will be installed along the sides and rear of the paver area. The DG border will be graded, compacted, and finished to complement the surrounding landscape while maintaining open access from the front of the shed.
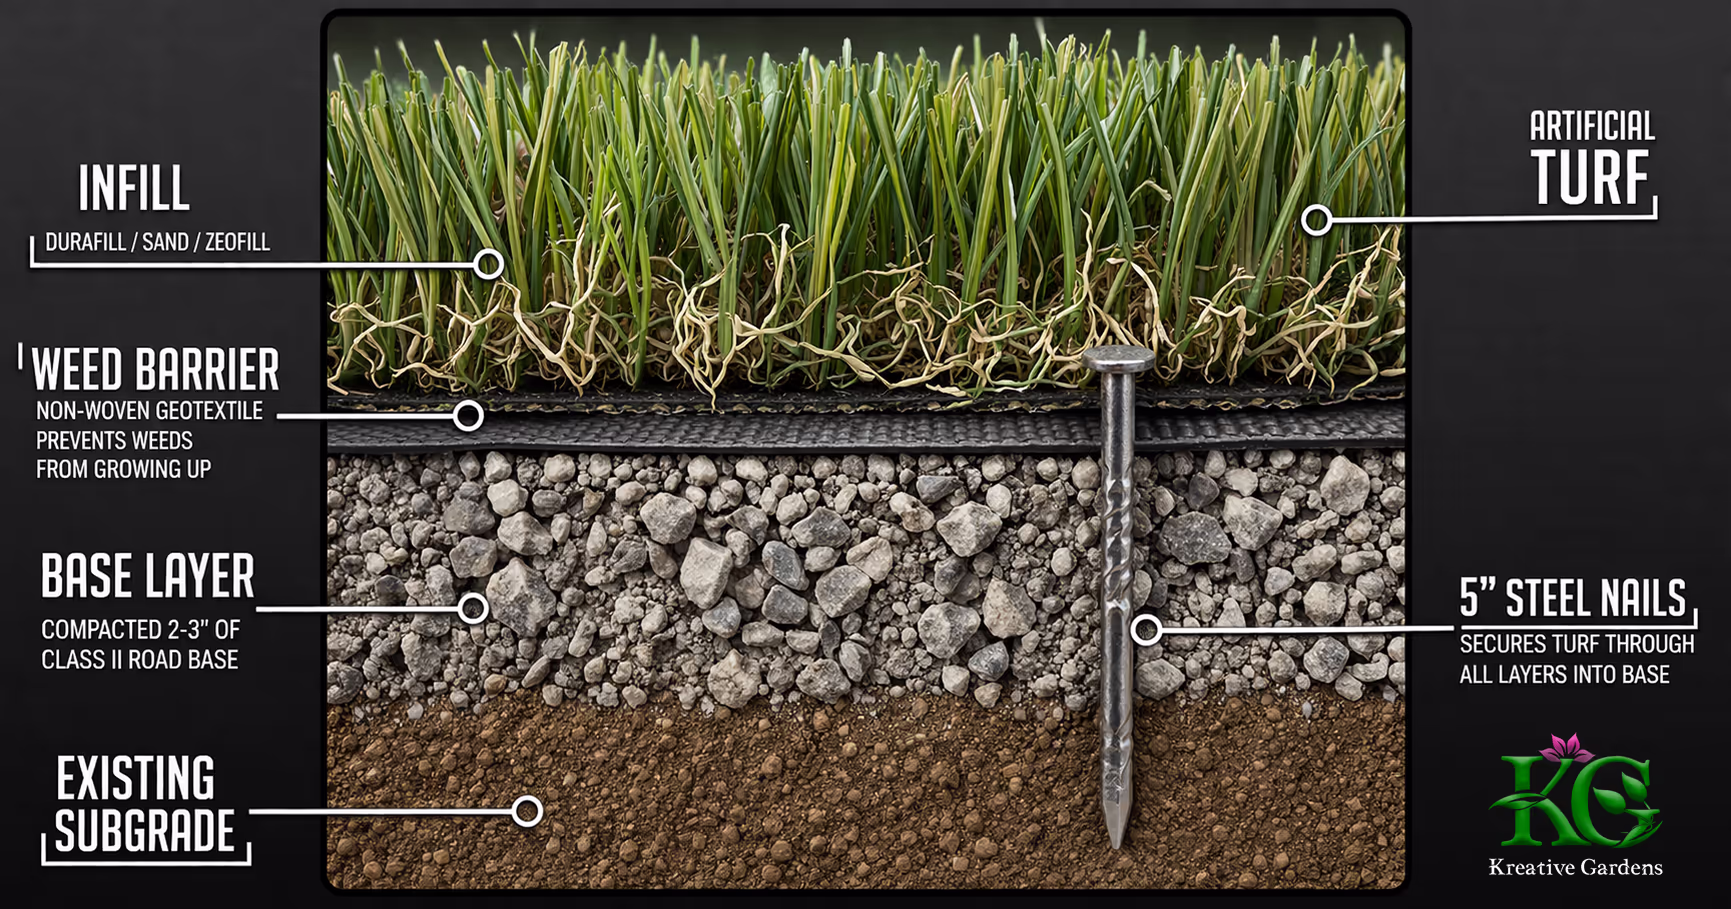
Installation of approximately 2,030 square feet of artificial grass throughout the primary backyard area. Existing soil will be prepared as required, followed by installation of a compacted aggregate base, final grading, weed barrier where applicable, artificial grass installation, seam joining, securing, power brooming, and infill application.
Artificial grass will be professionally cut and fitted around all project features, including the side border, shed foundation area, and rear retaining wall feature, creating a cohesive and low-maintenance landscape designed for year-round use.
Finished installation is intended to provide a clean, durable, and water-efficient alternative to natural grass while reducing ongoing maintenance requirements associated with traditional lawns.
This all-inclusive price covers everything required for a professional and lasting installation — from premium materials and delivery to expert labor, site preparation, and final cleanup. We handle the entire process so you don’t have to coordinate with multiple contractors or worry about hidden fees. What you see is what you pay.
Clients who choose to pay in full at the time of approval enjoy a reduced total. This offer reflects the savings we pass along by avoiding third-party financing and administrative fees — while still delivering the same high-quality results.
** This quote is valid for 15 days from the date issued. After this period, pricing and availability may be subject to change without notice.
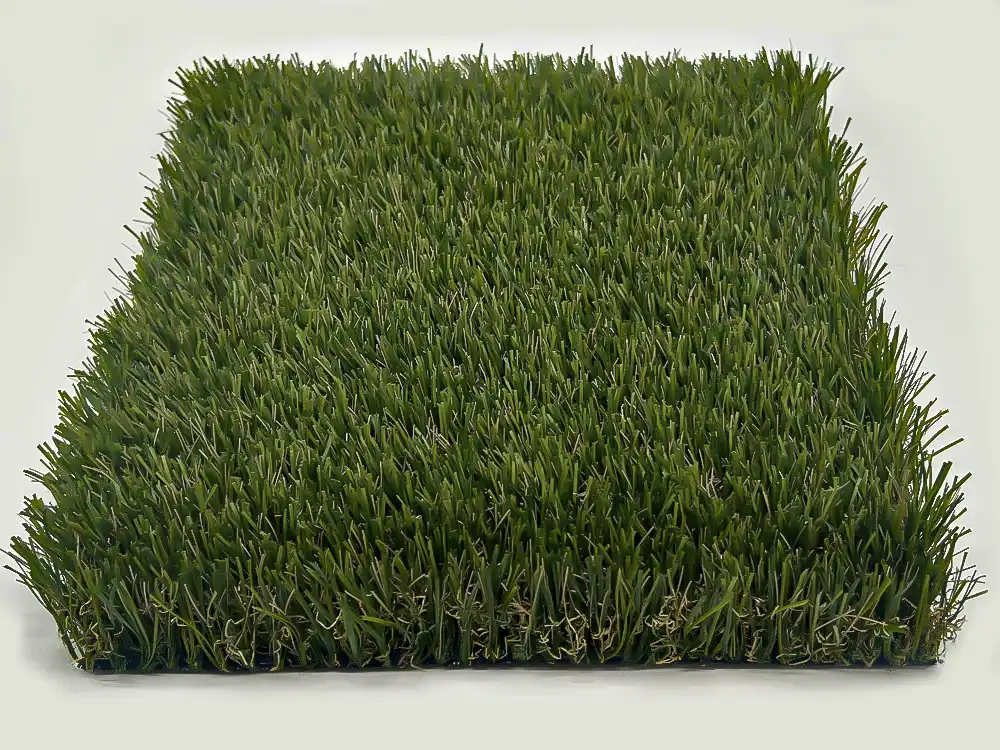
Oasis 98 artificial grass, offers a lush, natural appearance with a high-performance structure ideal for residential landscaping. Its dense 98oz total weight and 1.75" pile height provide a thick, cushiony surface, while the combination of green and beige thatch adds visual depth—mimicking the healthy and dry blades of real grass. The W&D monofilament blades are built with PE yarn and a high stitch rate of 12, delivering softness without compromising resilience. The Oasis 98 drains at 60L/m²/min (~0.022 gal/ft²/min), backed by a durable double PP primary backing and polyurethane coating. This model is perfect for customers who want a natural-looking lawn that performs under daily use with minimal maintenance. Backed by a 16-year warranty for long-term peace of mind.
Site Conditions & Soil Observations
Customer expressed concerns regarding possible ground movement or settlement within the property. Contractor is not a geotechnical engineer and makes no representations regarding soil stability, subsurface conditions, settlement, drainage, compaction, structural movement, or future soil performance. Proposal and pricing are based solely on visible site conditions observed at the time of inspection.
Historical aerial imagery reviewed by Contractor appears to show naturally rolling desert terrain that was subsequently mass-graded during development of the subdivision, which is standard practice for new residential developments. Any determination regarding soil stability, compaction, settlement, grading practices, or long-term performance of the building pad should be directed to the builder, developer, HOA, or a licensed geotechnical engineer.
Rear Retaining Wall
The proposed retaining wall is intended to create a defined landscape feature, establish a clean transition along the rear property line, and provide containment for the decorative rock buffer area. The wall is not intended to stabilize, reinforce, or remediate conditions occurring beyond the property line or on adjacent slopes.
Artificial Grass Installation
Due to the size and shape of the backyard, artificial grass will be installed using multiple sections professionally joined with seam tape and adhesive. While every effort is made to minimize visibility, seams are a normal and necessary part of large artificial grass installations.
Decorative Rock & DG Areas
Decorative rock and decomposed granite are natural landscape materials. Minor variations in color, texture, particle size, and appearance are normal and should be expected.
Paver Area
The proposed paver foundation is intended to support a typical residential storage shed. Customer is responsible for verifying manufacturer requirements for any future shed structure, including anchoring, permitting, wind-load requirements, and foundation specifications that may be required by the shed manufacturer, HOA, builder, or local jurisdiction.
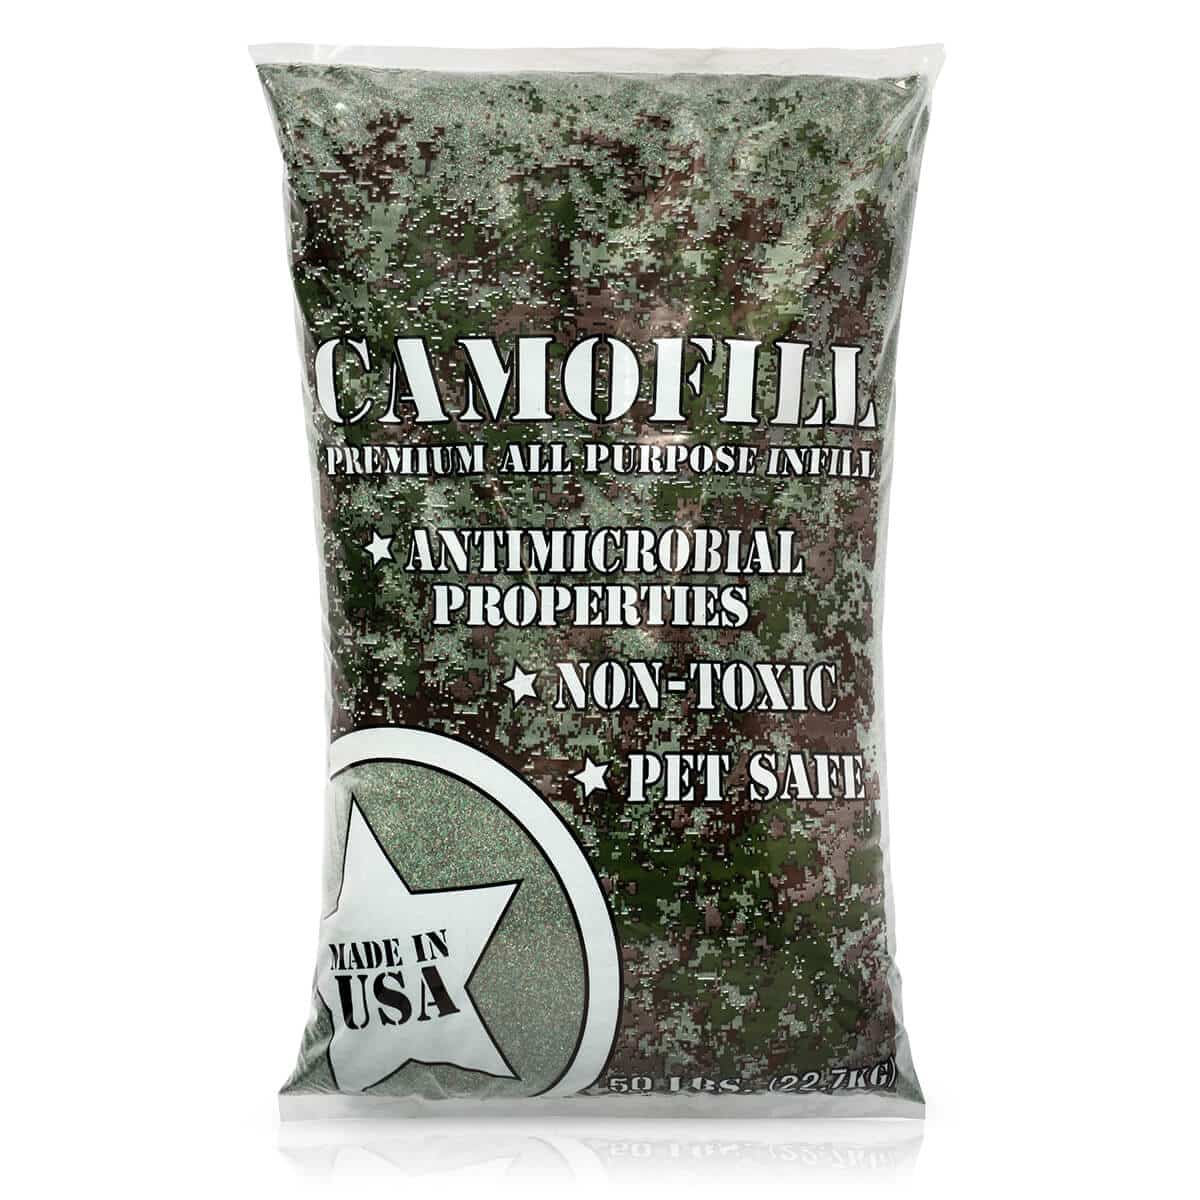
Premium CamoFill Infill
To enhance the performance of the artificial grass system, this proposal includes CamoFill premium infill. CamoFill helps support the turf fibers, improves resiliency and appearance, provides ballast to the installation, and may help reduce surface temperatures compared to conventional infill materials. This premium infill was selected to provide a more comfortable and enjoyable outdoor space while helping maintain the long-term appearance and performance of the artificial grass.
In many High Desert residential installations, a properly constructed artificial grass system does not require additional drainage. Artificial grass with a permeable backing, installed over a properly compacted Class II aggregate base and finished with positive grading (typically 1–2% slope), will naturally allow water to drain through the system and disperse into the underlying soil. For this reason, many projects of similar size are successfully installed without supplemental drains.
Should you desire additional drainage capacity, this option includes installation of two (2) NDS 6" catch basins with green grates connected by approximately 100 linear feet of 4" Triplewall Solid Drain Pipe routed to the existing front-yard overflow location. Installation includes trenching, pipe placement, fittings, connections, backfilling, compaction, and final testing of the system.
Drainage pricing assumes a reasonably unobstructed trench route from the proposed catch basins to the existing front-yard overflow. Pricing is based solely on visible site conditions at the time of inspection. Concealed utilities, undocumented drainage systems, buried obstructions, rock, unsuitable soils, existing irrigation lines, or other unforeseen subsurface conditions may require a change order. Utility locating will be performed prior to excavation if this option is selected.
While the proposed drainage system may provide additional water collection and conveyance capacity, no guarantee is made regarding the elimination of standing water, future settlement, groundwater conditions, drainage originating outside the property, or performance of builder-installed grading and drainage systems.
$1,750 Not included in quote price.
Please take a moment to review the details below. These notes cover important aspects of your project, such as warranties, material handling, and general terms. We believe in transparency and want you to feel confident every step of the way.
Mechanic's Lien Warning
Under California law, any contractor, subcontractor, laborer, supplier, or other person who helps improve your property but is not paid may record what is called a mechanic's lien on your property. A mechanic’s lien is a claim made against your property and may affect your ability to sell or refinance. This could happen even if you have paid your contractor in full.To protect yourself, you should request a Lien Release from all contractors and subcontractors after work is completed.
Change Orders
Any additions or modifications to the scope of work must be documented in a written change order, signed by both parties before additional work is performed. Change orders may result in additional charges and could impact the project timeline.
Right to Cancel
You may cancel this agreement within three (3) business days of signing without penalty, as required by California state law. After this period, cancellations may be subject to forfeiture of any paid deposit, restocking fees, and/or costs incurred by the contractor up to the date of cancellation.
Payments
A deposit is due upon approval of the quote. Balance is due upon project completion unless otherwise agreed in writing. Accepted payment methods include cash, check, Zelle, or debit/credit (fees may apply). Failure to remit final payment may result in collections or lien proceedings.
Project Delays or Access Restrictions
The client is responsible for ensuring access to the work area. Unforeseen delays due to weather, access, hidden utilities, or client-caused schedule changes may result in rescheduling and additional costs.
This quote is valid for 15 calendar days. After that, pricing may need to be adjusted to reflect current material or labor costs. We recommend confirming your project promptly to lock in this rate.
Governing Law
This agreement shall be governed by and interpreted in accordance with the laws of the State of California. Any disputes shall be resolved in San Bernardino County, California.